


Connect a RAK7204 to Helium and Forward Its Data to Ubidots

Environmental sensors are one of the most common in the different Internet of Things (IoT) verticals. Their primary purpose is to analyze trends and patterns of air pollutants in the atmosphere - the gas layer surrounding a light blue body, like the Earth.
The environmental monitoring depends entirely on the scenario where you intend to apply it. However, among the most relevant environmental monitoring aims to ensure the fulfillment of environmental regulations within companies in both offices and factories, perform efficiency assessment of machinery, and find human and wildlife risks, among others.
However, to be capable of analyzing trends and patterns, we must have devices capable of transmitting data to a service that enables us not only to manage historical data but also to take action based on that data. In this way, we can analyze data to make smarter decisions, leading us to an exponential efficiency in our processes. These services operate both locally and in the cloud - our best friend in the 21st century. It will depend entirely on the solution requirements, and of course, the budget available for the project.
In this guide, I provide a comprehensive set of directions on how to acquire environmental data to transmit it to a cloud service using Helium technology - the world's first peer-to-peer wireless network that provides a secure and cost-effective way for low-power Internet of Things devices to send data to and from the Internet.
Best of all, you don't have to be an expert to get started. So, let's begin:
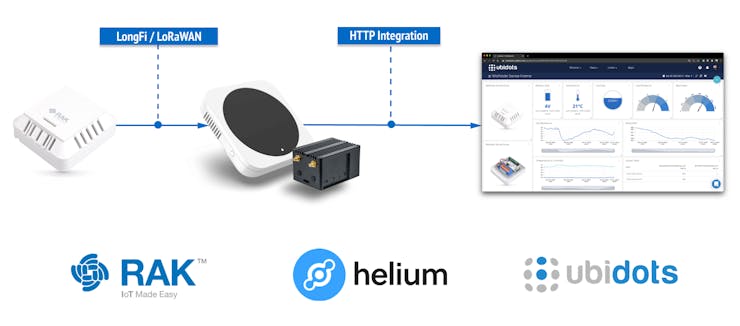
As you can see in the architecture above, the environmental data is acquired by a RAK7204 WisNode Sense Home. It sends the data to the Internet over the Helium LongFi network, which combines the LoRaWAN wireless protocol with Helium Blockchain so that any LoRaWAN compatible device can transfer data. Once the data has been received in the Helium console, it is decoded to forward the data to Ubidots, an Internet of Things (IoT) platform that allows monitoring and control of all the acquired data.
Step-by-step
1. Prerequisites2. RAK7204 WisNode Sense Home and Helium Integration3. Helium and Ubidots Integration4. Ubidots Setup5. What’s next?
1. Prerequisites
Hardware
Software
2. RAK7204 WisNode Sense Home and Helium Integration
The RAK7204 is an LPWAN Node with an integrated high-precision environmental sensor. It can measure changes in temperature, humidity, air pressure. All the data sensed can be sent to Helium through a Helium Hotspot / RAK Hotspot Miner to be forwarded to the cloud later.
IMPORTANT NOTE: In this guide, we assume that you already have a hotspot configured in the Helium Console, or that you have network coverage nearby.
Helium Setup
To manage our devices in the Helium Console, we must use "Labels." A powerful mechanism that provides scalability and flexibility to our projects by organizing devices, assigning integrations, adding functions, and so on.
Step 1: To add a new label, go to “Labels > Create a new label.”
Step 2: Assign a Label name. For example, “RAK7204 WisNodes”. Then, click on “Create label.”
Step 3: To add a new device, go to “Devices > Add a new device.”
Step 4: Assign a Device Name. For example, “RAK7204 #1”. Then, attach the label previously created and click on “Submit.”
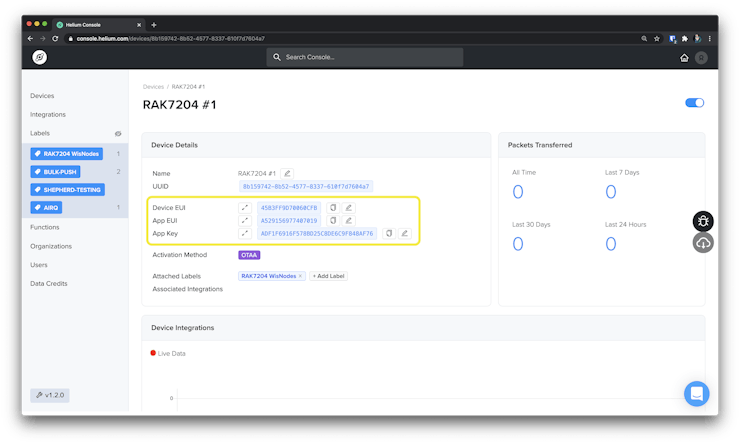
Step 5: Click on the device created, and save the Device EUI, App EUI, App Key for the RAK7204 setup.
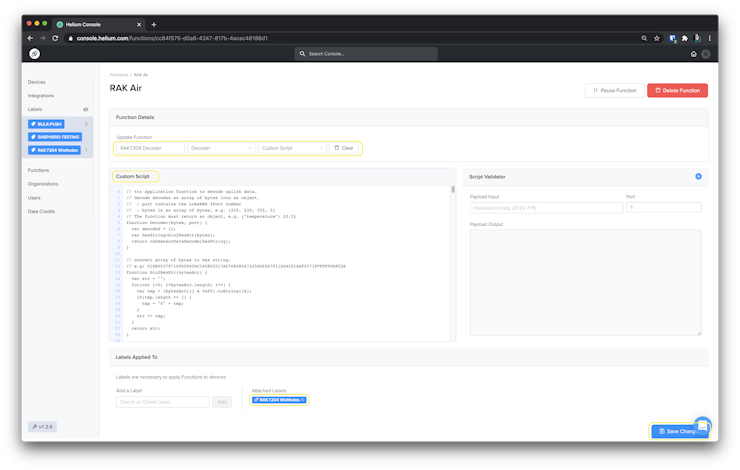
Step 6: To decode the incoming data, a decoder function must be created. Go to “Functions > Create New Function.”
Step 7: Assign a function name. Then, choose “Decoder” as Function Type, and “Custom script” as Format.
Step 8: Paste the following code inside the code editor box.
// Function to decode uplink data.
// Decode decodes an array of bytes into an object.
//  - port contains the LoRaWAN fPort number
//  - bytes is an array of bytes, e.g. [225, 230, 255, 0]
// The function must return an object, e.g. {"temperature": 22.5}
function Decoder(bytes, port) {
 var decoded = {};
 var hexString=bin2HexStr(bytes);
 return rakSensorDataDecode(hexString);
}

// convert array of bytes to hex string.
// e.g: 0188053797109D5900DC140802017A0768580673256D0267011D040214AF0371FFFFFFDDFC2E
function bin2HexStr(bytesArr) {
 var str = "";
 for(var i=0; i<bytesArr.length; i++) {
   var tmp = (bytesArr[i] & 0xff).toString(16);
   if(tmp.length == 1) {
     tmp = "0" + tmp;
   }
   str += tmp;
 }
 return str;
}

// convert string to short integer
function parseShort(str, base) {
 var n = parseInt(str, base);
 return (n << 16) >> 16;
}

// convert string to triple bytes integer
function parseTriple(str, base) {
 var n = parseInt(str, base);
 return (n << 8) >> 8;
}

// decode Hex sensor string data to object
function rakSensorDataDecode(hexStr) {
 var str = hexStr;
 var myObj = {};

 while (str.length > 4) {
   var flag = parseInt(str.substring(0, 4), 16);
   switch (flag) {
     case 0x0768:// Humidity
       myObj.humidity = parseFloat(((parseShort(str.substring(4, 6), 16) * 0.01 / 2) * 100).toFixed(1)) + "%RH";//unit:%RH
       str = str.substring(6);
       break;
     case 0x0673:// Atmospheric pressure
       myObj.barometer = parseFloat((parseShort(str.substring(4, 8), 16) * 0.1).toFixed(2)) + "hPa";//unit:hPa
       str = str.substring(8);
       break;
     case 0x0267:// Temperature
       myObj.temperature = parseFloat((parseShort(str.substring(4, 8), 16) * 0.1).toFixed(2)) + "°C";//unit: °C
       str = str.substring(8);
       break;
     case 0x0188:// GPS
       myObj.latitude = parseFloat((parseTriple(str.substring(4, 10), 16) * 0.0001).toFixed(4)) + "°";//unit:°
       myObj.longitude = parseFloat((parseTriple(str.substring(10, 16), 16) * 0.0001).toFixed(4)) + "°";//unit:°
       myObj.altitude = parseFloat((parseTriple(str.substring(16, 22), 16) * 0.01).toFixed(1)) + "m";//unit:m
       str = str.substring(22);
       break;
     case 0x0371:// Triaxial acceleration
       myObj.acceleration_x = parseFloat((parseShort(str.substring(4, 8), 16) * 0.001).toFixed(3)) + "g";//unit:g
       myObj.acceleration_y = parseFloat((parseShort(str.substring(8, 12), 16) * 0.001).toFixed(3)) + "g";//unit:g
       myObj.acceleration_z = parseFloat((parseShort(str.substring(12, 16), 16) * 0.001).toFixed(3)) + "g";//unit:g
       str = str.substring(16);
       break;
     case 0x0402:// air resistance
       myObj.gasResistance = parseFloat((parseShort(str.substring(4, 8), 16) * 0.01).toFixed(2)) + "KΩ";//unit:KΩ
       str = str.substring(8);
       break;
     case 0x0802:// Battery Voltage
       myObj.battery = parseFloat((parseShort(str.substring(4, 8), 16) * 0.01).toFixed(2)) + "V";//unit:V
       str = str.substring(8);
       break;
     case 0x0586:// gyroscope
       myObj.gyroscope_x = parseFloat((parseShort(str.substring(4, 8), 16) * 0.01).toFixed(2)) + "°/s";//unit:°/s
       myObj.gyroscope_y = parseFloat((parseShort(str.substring(8, 12), 16) * 0.01).toFixed(2)) + "°/s";//unit:°/s
       myObj.gyroscope_z = parseFloat((parseShort(str.substring(12, 16), 16) * 0.01).toFixed(2)) + "°/s";//unit:°/s
       str = str.substring(16);
       break;
     case 0x0902:// magnetometer x
       myObj.magnetometer_x = parseFloat((parseShort(str.substring(4, 8), 16) * 0.01).toFixed(2)) + "μT";//unit:μT
       str = str.substring(8);
       break;
     case 0x0a02:// magnetometer y
       myObj.magnetometer_y = parseFloat((parseShort(str.substring(4, 8), 16) * 0.01).toFixed(2)) + "μT";//unit:μT
       str = str.substring(8);
       break;
     case 0x0b02:// magnetometer z
       myObj.magnetometer_z = parseFloat((parseShort(str.substring(4, 8), 16) * 0.01).toFixed(2)) + "μT";//unit:μT
       str = str.substring(8);
       break;
     default:
       str = str.substring(7);
       break;
   }
 }

 return myObj;
}
Step 9: Attach the label previously created and click on “Save Function.”
RAK7402 Setup
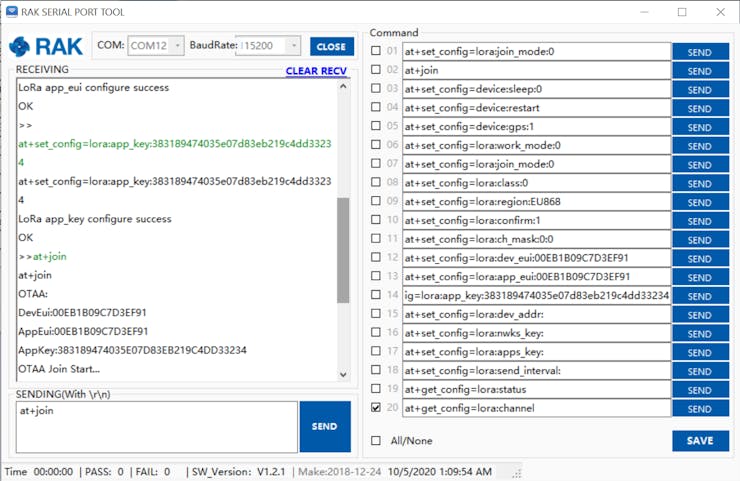
The WisNode Sense works out of the box with firmware supporting LoRaWAN. We just need to interface with it using the RAK Serial Port tool to set up the parameters necessary to join the Helium Network. To start with the tool, follow all the steps provided in the guide below:
Interfacing with the RAK7204 WisNode Sense Home
Once the serial communication with the device has been successfully established, check the firmware version with the AT command (at+version) and update it to the latest version if needed. We can then execute the following commands to set the parameters required to establish a connection with the Helium Network.
Step 1: Set OTAA as activation mode
- OTAA activation mode: at+set_config=lora:join_mode:0
Step 2: Type the following AT command to set the: Frequency/Region, Device EUI, Application EUI, and Application Key. Remember to replace the "xxxx" with the corresponding parameter provided in the helium device creation process (Figure X, Step X, etc.).
- Frequency/Region: at+set_config=lora:region:xxxxxx
- Device EUI: at+set_config=lora:dev_eui:xxxxxxxxxxxxxxxx
- Application EUI: at+set_config=lora:app_eui:xxxxxxxxxxxxxxxx
- Application Key: at+set_config=lora:app_key:xxxxxxxxxxxxxxxxxxxxxxxxxxxxxxxx
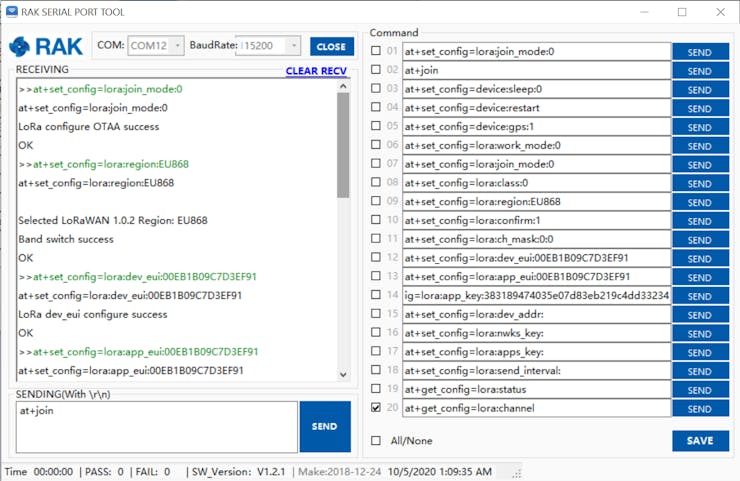
Step 3: Join the network in OTAA mode:
- Join: at+join
Step 4: Set the interval of sending data:
- Interval set up: at+set_config=lora:send_interval:X:Y
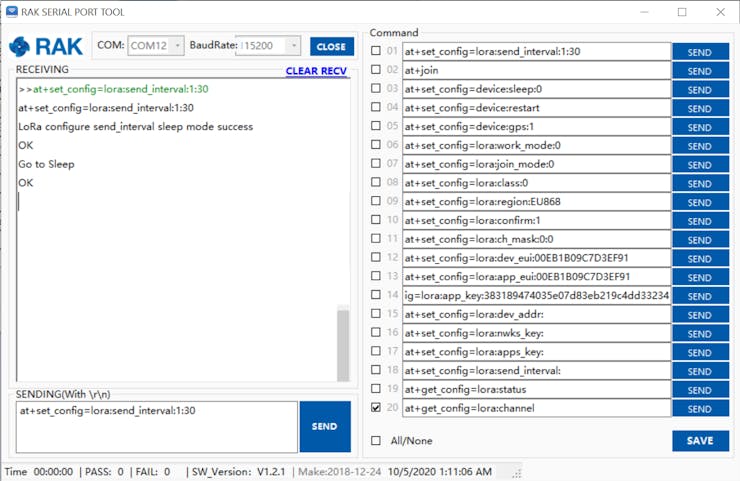
Where:
- X - open or close the interval mechanism of sending data. If X is set to 0, the device will not send data automatically. If X is set to 1, the device will send data every Y second.
- Y - interval time in seconds. This parameter is only valid when X is set to 1.
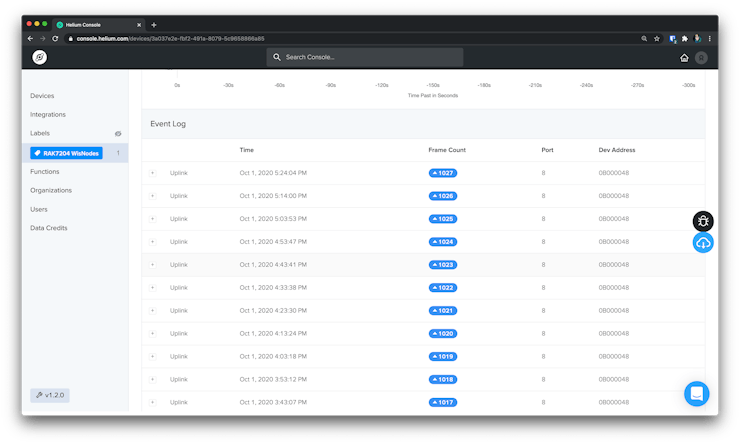
Now you can visualize the sensor data as it is arriving in real-time in the Helium console. Enter the page of the device you just created and check the Event Log section at the bottom:
3. Helium and Ubidots Integration
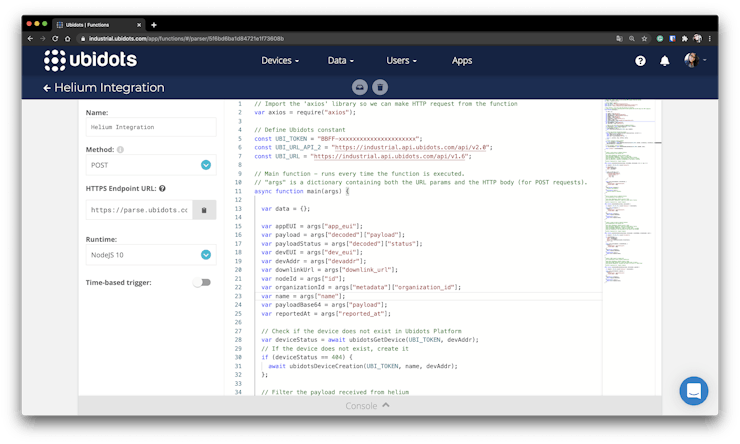
To push data from the Helium console to Ubidots to develop and deploy IoT applications, you can use a Helium feature called “Integrations.” This is a feature that simply forwards all the incoming data received to Ubidots using an UbiFunction.
UbiFunction Setup
The UbiFunction will handle Helium's JSON schema to manage both uplink and downlink messages within the platform.
NOTE: Due to the presented solution not utilizing downlink messages, the example below will not manage this message type. In case you desire to manage downlink messages, you must handle an HTTP POST request to the URL provided under the key "downlink_url" received in the JSON schema.
Follow the instructions below to create an UbiFunction in your Ubidots account:
Step 1: Click on “Devices > Function”
Step 2: Click the plus icon (“+”) button located in the upper-right corner.
Step 3: Assign a name for your UbiFunction. For example, “Helium Integration.”
Step 4: Select “POST” as the Method
Step 5: Select “NodeJS 10” as the Runtime
Step 6: Leave the “Time-based trigger” option disabled
Step 7: Paste the code below in the UbiFunction Editor
// Import the 'axios' library so we can make HTTP request from the function
var axios = require("axios");

// Define Ubidots constant
const UBI_TOKEN = "BBFF-xxxxxxxxxxxxxxxxxxxxxxxxxxxxxxxxxxxxxxxxxxxxxxxx";
const UBI_URL_API_2 = "https://industrial.api.ubidots.com/api/v2.0";
const UBI_URL = "https://industrial.api.ubidots.com/api/v1.6";

// Main function - runs every time the function is executed.
// "args" is a dictionary containing both the URL params and the HTTP body (for POST requests).
async function main(args) {

 var data = {};
  var appEUI = args["app_eui"];
 var payload = args["decoded"]["payload"];
 var payloadStatus = args["decoded"]["status"];
 var devEUI = args["dev_eui"];
 var devAddr = args["devaddr"];
 var downlinkUrl = args["downlink_url"];
 var nodeId = args["id"];
 var organizationId = args["metadata"]["organization_id"];
 var name = args["name"];
 var payloadBase64 = args["payload"];
 var reportedAt = args["reported_at"];

 // Check if the device does not exist in Ubidots Platform
 var deviceStatus = await ubidotsGetDevice(UBI_TOKEN, devAddr);
 // If the device does not exist, create it
 if (deviceStatus == 404) {
   await ubidotsDeviceCreation(UBI_TOKEN, name, devAddr);
 };

 // Filter the payload received from helium
 const variables = Object.entries(payload).reduce((previous, current) => {
   const [key, value] = current;
   const varValue = parseFloat(value);
   const unit = value.replace(/[\d\.]/g, '')

   return [...previous, [key, varValue, unit]];
 }, []);

 // Create respective custom variables
 for (const variable of variables) {
   var variableStatus = await ubidotsVariableCreation(UBI_TOKEN, devAddr, variable[0], variable[0], variable[2]);
   data[variable[0]] = variable[1]
 }
 // Send variables' values to Ubidots
 var variablesRequest = await ubidotsSendVariableValues(UBI_TOKEN, devAddr, data);
  return {"status": variablesRequest};
}

/*
* Create a custom device in Ubidots Platform
* API Documentation: docs.ubidots.com
*
* @arg token [Mandatory], Ubidots account's Token
* @arg deviceName [Mandatory], device's friendly name
* @arg deviceLabel [Mandatory], single and unique label of device
* @arg lat [Optional], latitude corresponding to the device's location
* @arg lng [Optional], longitude corresponding to the device's location
*
* @return response/error, request response
*/
async function ubidotsDeviceCreation(token, deviceName, deviceLabel, lat = 0, lng = 0) {

 var endpoint = UBI_URL_API_2.concat("/devices");

 var deviceParams = {
   "label": deviceLabel,
   "name": deviceName
 };

 if (lat != 0 && lng != 0) {
   deviceParams.properties = {
     "_location_type":"manual",
     "_location_fixed": {
       "lat": lat,
       "lng": lng
     }
   };
 }

 return axios.post(endpoint, deviceParams, {
   headers: {
     "content-type": "application/json",
     "X-Auth-Token": token
   }
 })
 .then(function (response) {
   //console.log(response);
 })
 .catch(function (error) {
   //console.log(error.response);
 });
}

/*
* Get an existent device in Ubidots Platform
* API Documentation: docs.ubidots.com
*
* @arg token [Mandatory], Ubidots account's Token
* @arg deviceLabel [Mandatory], single and unique label of device
*
* @return response/error, request response
*/
async function ubidotsGetDevice(token, deviceLabel) {

 var endpoint = UBI_URL_API_2.concat("/devices/~" + deviceLabel);

 return axios.get(endpoint, {
   headers: {
     "content-type": "application/json",
     "X-Auth-Token": token
   }
 })
 .then(function (response) {
   return response.statusText;
 })
 .catch(function (error) {
   return error.response.status;
 });
}

/*
* Create a custom variable in Ubidots Platform
* API Documentation: docs.ubidots.com
*
* @arg token [Mandatory], Ubidots account's Token
* @arg deviceLabel [Mandatory], single and unique label of device
* @arg variableName [Mandatory], variable's friendly name
* @arg variableLabel [Mandatory], single and unique label of variable
* @arg unit [Mandatory], unit associated to the value of the variable
*
* @return response/error, request response
*/
async function ubidotsVariableCreation(token, deviceLabel, variableName, variableLabel, unit) {

 var endpoint = UBI_URL_API_2.concat("/variables");
  var variableParams = {
   "label": variableLabel,
   "name": variableName,
   "device": "~".concat(deviceLabel).toLowerCase(),
   "unit": unit
 };

 return axios.post(endpoint, variableParams, {
   headers: {
     "content-type": "application/json",
     "X-Auth-Token": token
   }
 })
 .then(function (response) {
   return response.statusText;
 })
 .catch(function (error) {
   return error.response.status;
 });
}

/*
* Handle a POST request to Ubidots API
* API Documentation: https://ubidots.com/docs/sw/
*
* @arg token [Mandatory], Ubidots account's Token
* @arg device_label [Mandatory], single and unique label of device
* @arg payload [Mandatory], variables and values to be sent in a JSON format
*
* @return response/error, request response
*/
async function ubidotsSendVariableValues(token, deviceLabel, payload) {

 var endpoint = UBI_URL.concat("/devices/" + deviceLabel);
  return axios.post(endpoint, payload, {
   headers: {
     "content-type": "application/json",
     "X-Auth-Token": token
   }
 })
 .then(function (response) {
   return response.statusText;
 })
 .catch(function (error) {
   return error.response.status;
 });
}
Step 8: Replace the value of the variable called “UBI_TOKEN” with the Ubidots Token associated with your account.
Step 9: Save the UbiFunction by clicking on the “Make it live” button located in the down-left corner
Step 10: Copy the URL generated under the “HTTPS Endpoint URL” box.
Once the function has been successfully created, you must observe the following:
Helium Integration Setup
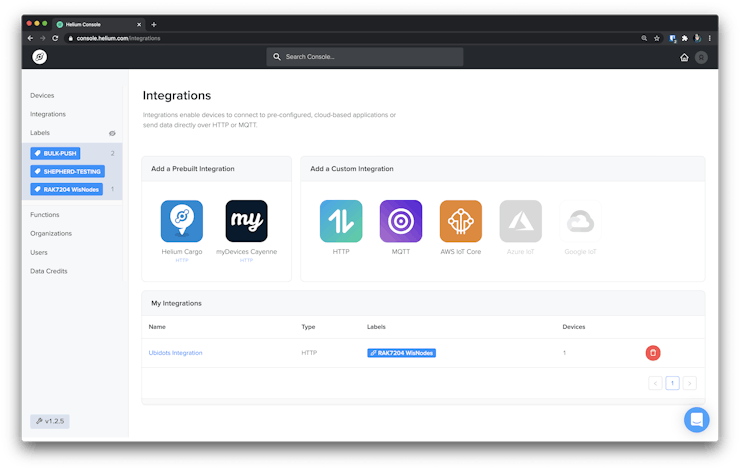
The Helium Integration enables devices to connect to pre-configured, cloud-based applications or send data directly over HTTP or MQTT. For this project, we’re going to be using the HTTP integration.
Follow the instructions below to create an Integration in your Helium console:
Step 1: From left side navigation, click on “Integrations.”
Step 2: Choose “HTTP” as the custom integration type
Step 3: Under the “HTTP Connection details” option, assign “POST” as a method, and the UbiFunctionHTTPS Endpoint URL as Endpoint.
Step 4: Assign a name for your Helium Integration. For example, “Ubidots Integration.”
Step 5: Assign the “Label” associated with the device you desire to integrate with Ubidots.
Step 6: Save the integration by clicking on the “Create Integration” button
Once the integration has been successfully created, you must observe the following:
Integration Test
Once you have set up both services, the environmental values sensed by the RAK7402 will be updated once the next data package arrives at the Helium console.
To check if the integration is running successfully. Go to the helium console and click on the "Devices" section. Then, choose any device that contains the label associated with the Ubidots integration, and click on the debug option:

At this point, you can notice the message "Waiting for data..." in the debug console until a new data packet is received. Once received, the following response will be reported in the Integration option:
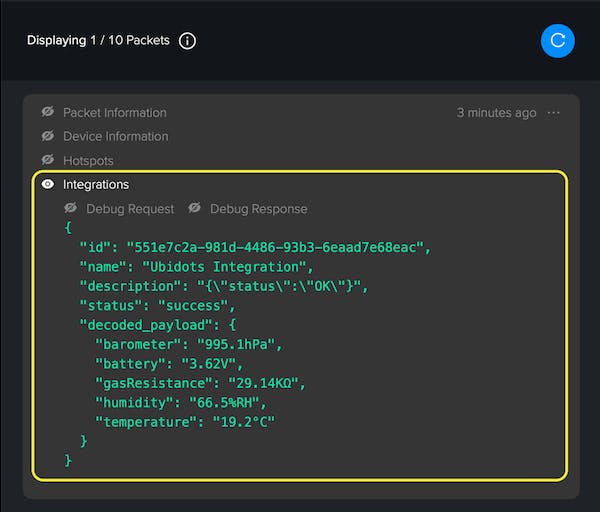
After clicking on the created device, we can see all the environmental variables reported by the RAK7204 WisNode Sense Home.
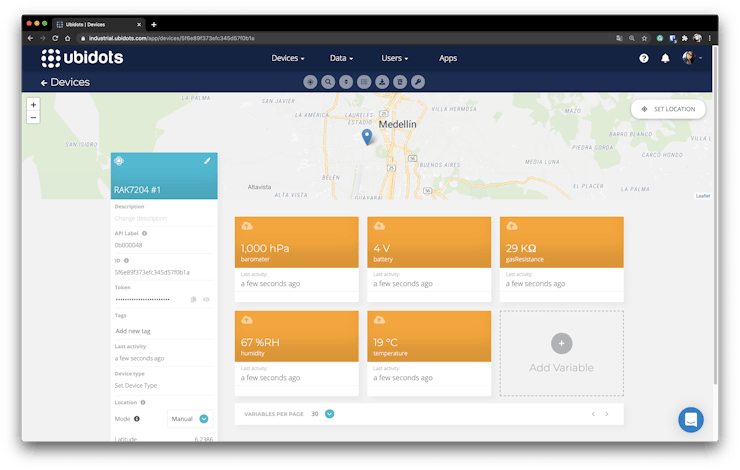
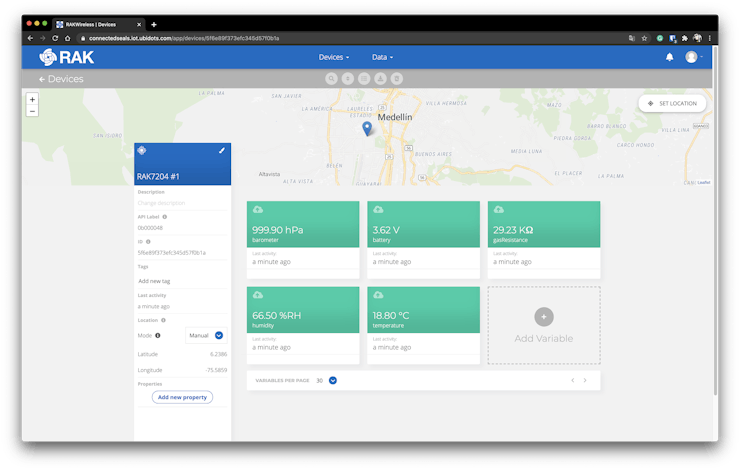
The last step is to check if the data arrived properly in the Ubidots Platform. Go to the account and click on "Devices > Devices" in this section, we will notice that a new device has been automatically created. After clicking on the device, we can see all the environmental variables reported by the RAK7204 WisNode Sense Home:
Voilà, that's how easy was the integration between RAK products with helium and Ubidots.
In case you have more than one RAK7204 configured in the Helium console, they will also be automatically created in Ubidots, as long as all the devices manage the same label. Do you have 1, 100, or 1000 devices? No problem. With this single integration, you would be able to support all the devices you wish. 😉
4. Ubidots setup
Ubidots is an IoT platform with the potential of managing IoT applications with just a couple of clicks. It doesn't matter if you're an IoT enthusiast, or if you're looking to build an application for end-users, they have the right tools. To learn more about the Ubidots' powerful features, I encourage you to visit their help center.
Below, we are going to show you how to create a custom dashboard to centralize all the environmental data in just one place. In addition to this, we will show how to do a branded platform for your company - just in case you are seeking to provide a final solution to a client.
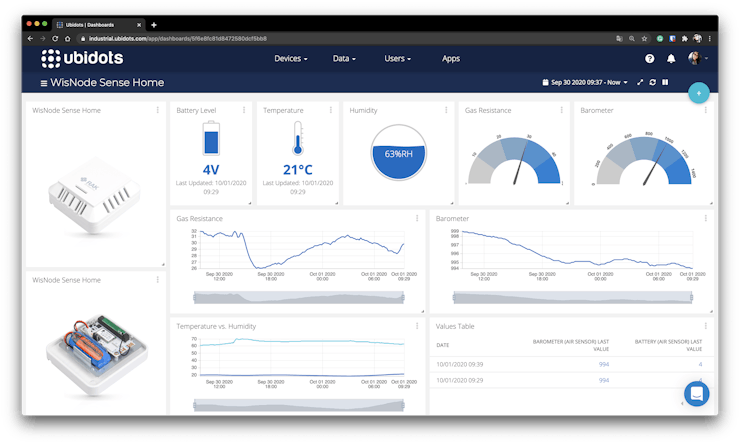
Dashboard setup
Below we provide the basic steps to configure a dashboard. To become a pro setting up a custom dashboard at Ubidots, refer to the official documentation.
Step 1:To create a new dashboard, navigate to “Data > Dashboard.”
Step 2: Click on “New Dashboard” or the plus icon (“+”) button located in the upper-right corner.
Step 3: Assign a name for your dashboard. For example, “WisNode Sense Home.”
Step 4: Assign any additional settings desired for the dashboard, whether it is the type of dashboard, appearance, format, among other things. For more detailed information, refer to this guide.
Step 5: To add a new widget, click on the plus icon (“+”) button located in the upper-right corner.
Step 6: Select the desired widget type to display the data
Step 7: Under the “Data” field, click on “Add variable” and choose the variable you intend to show in the dashboard and set the desired widget configurations.
Step 8: To save the changes, click on the check green icon located in the bottom-right corner.
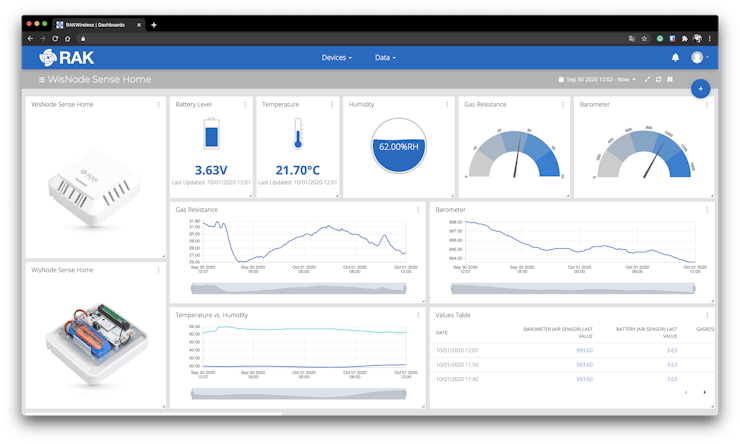
You can add as many widgets as you need for your dashboard. It's time to have a look at the variety of widgets offered by Ubidots. Once you have achieved this, you will have something like this:
Ubidots App Setup
Delivering an IoT solution can become a nightmare when the right tools are not available. Using Ubidots powered apps, we can manage organizations and users, even customize the platform with a product's brand in an easy way.
As your Ubidots account's admin, you’re responsible for creating, distributing, and accessing any app, you desired to create. The following diagram shows the 4 stages applied to develop and deploy an application using Ubidots
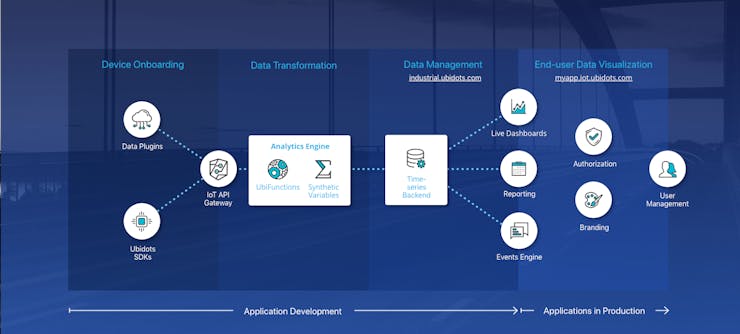
Source: Ubidots Help Center - https://help.ubidots.com/en/articles/2218155-ubidots-app-s
Refer to the Ubidots App(s) official guide for a detailed explanation about each of the stages.
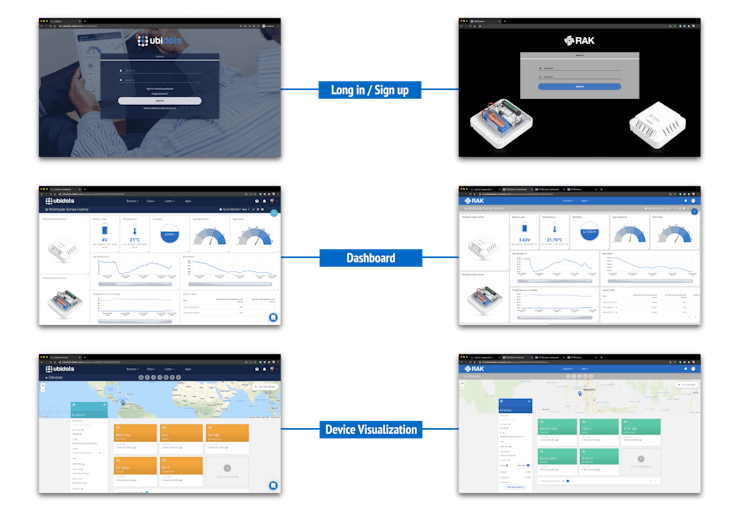
Meanwhile, see the following interfaces to have a better idea about the final application we can achieve:

That's how easy it is to create a 100% customized IoT platform with your product's brand.
5. What’s next?
Did you ever consider that it was so simple and easy to develop a custom IoT application? If you're looking for a quick and reliable way to monitor environmental data, you've read the right guide. With this integration, it doesn't matter how many sensors you intend to install. Just follow the same steps to integrate as many as you need under the Helium Network, then Ubidots will take over and create them automatically.
To manage alarms or actions based on the data, you can also explore the Ubidots' Events module, which offers various options.
What's next? It's time to try it yourself. You can use the resources listed below to further your exploration of the world of IoT.
- RAK end-users devices that serve a case scenario in a cost-efficient manner
- From prototype to the final product and mass production with WisBlock
- Build a DIY Helium Hotspot
Original Post 👇 https://www.hackster.io/mariacarlinahernandez/connect-a-rak7204-to-helium-and-forward-its-data-to-ubidots-073793


