


LoRaWAN Outdoor DIY Gateway with RAK2245 Pi HAT + RPi 3B+ + IP67 Enclosure + Batteries

Todor Velev and Vladislav Yordanov did a similar project some time ago. They used the good old RAK831 and they did a similar build to this one, using an IP67 casing in order to make a weatherproof outdoor gateway. They have it working for 7-8 months now. It has been pretty solid, with the exception of the fact that they had to add a small fan after they initially tested it to circulate the air in the box as it was overheating the electronics. Since the fan was installed, it has been rock-solid, no issues and has been working outside enduring heavy rains, thunderstorms, scorching sun and there have been no issues. Winter is coming so this will be the final test of its resiliency, however, we expect good results.
You can check what the old gateway looks like in the picture. It is a bit gruff and looks a bit worn out (the casing is a recycled one), but as we said it performs very nicely. We are not going to discuss the old build, as we are eager to move to the new one. As we took the list of items you need out of the way we can now proceed to guide you through the process of assembling our little beauty.
So, what are the main upgrades we have planned?
First of all, we are using the successor to the RAK831, the RAK2245. It is supposed to be cooler, more resistant to interference, and appears to be a bit smaller. Ah and the best thing is that the GPS is built-in and it has no converter board so everything is in one package, which, also makes it a lot smaller (more space, better cooling perhaps?).
This is as far as upgrading the LoRa portion, however, we added some more goodies like a battery pack for example.
Step 1
We went the cheap and dirty way by using a universal breadboard, so no need to etch it. Not a very elegant solution, but pretty versatile. Simply make some holes in the FR material of the board for the screws that are going to hold it to the back of the casing. Keep in mind that your case might have screw holes placed in different positions or none at all, in which case you will have to take care of this issue on your own. Whatever the case, make sure to secure it tightly and put some distance between it and the backplate. You can see what it looks like in our case in the next image.

Step2
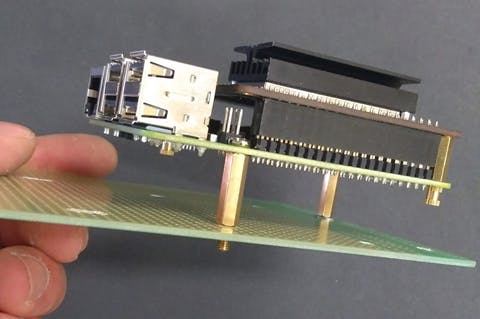
We are going to do a little try here in order to save some money (and having to screw 4 more distancers) as RAK2245 comes with 4 distancers we can use the 2 to mount the Raspberry Pi (RPi) to the PCB base and the other 2 to mount the RAK2245 itself to the RPi. It is surprisingly stable. 😊


Step 3
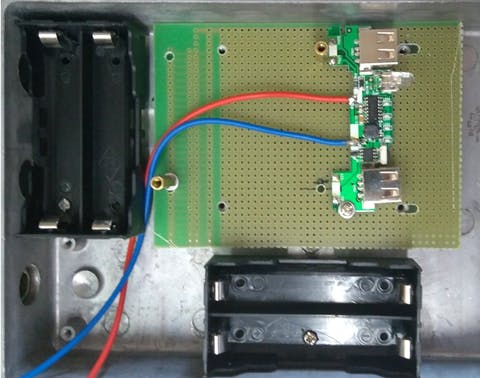
This step is more like dependent on how the best things fit in your particular casing and what you consider to be a good arrangement. This might look very different in your case; however, this is not a bad thing. For us, it made sense to put the batteries as far up as possible as the heat up when charging and we do not need them to act as heating elements for the Concentrator and the RPi. 😊


Initially, we were going to build a small charging circuit/board to charge the batteries, but as we had one lying around, we used it instead. Well you caught us we did not have it lying around, but breaking apart a solar charging battery kit is a small price to pay to have power backup for our Gateway. Plus, the whole thing cost $5, which is also the reason we have not included it in the list of items.

Step 4
As the RAK2245 Concentrator has iPEX connectors for both the GPS and LoRa antennas we have decided to use a couple of RP-SMA to iPEX pig-tils to extend the ports. We believe that this is a better design as the ports are easier to access, plus larger antennas are more likely to have an SMA connector than iPEX.
The GPS antenna is included with the RAK2245. As you can see, it is quite small, and it is meant to be mounted inside a housing. (iPEX connector). This and the casing being metallic (potentially blocking signals), lead us to use an external GPS antenna as shown in the next image (this came with our RAK831 kit, you can also get it from the store.RAKwireless.com). Now putting these SMA to iPEX cables is starting to make sense.😉

We can use what we had from our RAK831 kit (you can see it in the next image), we believe that the store.RAKwireless.com sells it separately, so you can get the same one.

Interestingly enough, after deploying the Gateway we tested it with the small antenna, putting it inside the box seemed to not prevent reception. This should have been impossible in the world I live in (the writer), so we have no good explanation for it.
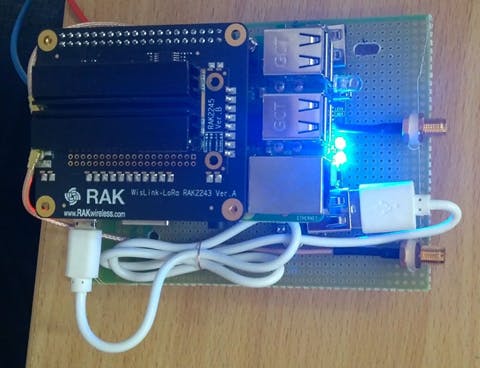
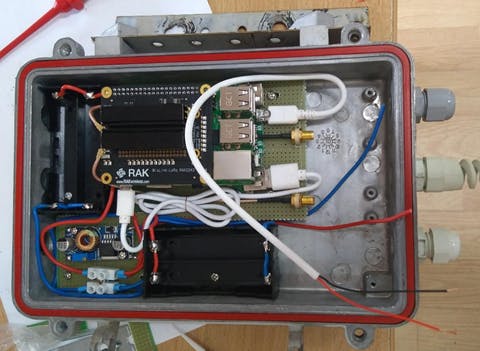
We finished this step by putting the RPi, RAK2245 and the antenna cables together and on the board. As we were too lazy to solder connectors to make a proper cable, we used a USB cable we had lying around. In the image below you can see how it all came together.
Step 5
Ok time to put it all in the casing. Hopefully, it will fit. 😉 Make sure you route everything nicely, not necessarily as we did (color coding would be a good idea).
Make sure to also plan where you are going to put the PoE splitter as you will need some space for the cabling. As it made the most sense at the time, we shifted the boards and batteries to the top and left some space for the cabling at the bottom as there is where the cable glands are. Check out the images below.
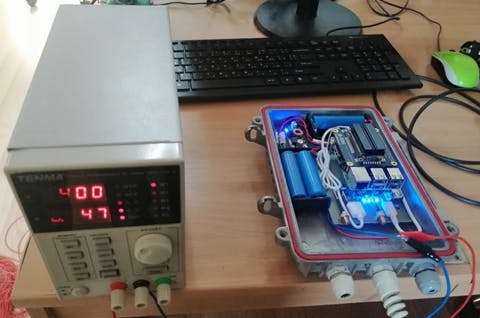
A good practice is to test powering the board before actually adding the finishing touches. Luckily, we had a power supply in the office, so we tested everything and it powered on nicely and the batteries charge as they should (we had some explosive adventures not so long ago so we are a bit edgy when it comes to batteries). Everything went well and we are now sure that we have routed everything properly and there are only some final touches.
Well not really, we still need to connect the PoE splitter and put a small fan for cooling. Yes, we did say this is one of the things we wanted to improve (remove). However, we did not take into account that the previous one had no batteries, so removing the fan seemed possible in light of the larger casing and cooler running Concentrator module. It did not turn out to be the case as the batteries heat up a lot when charging.
Step 6
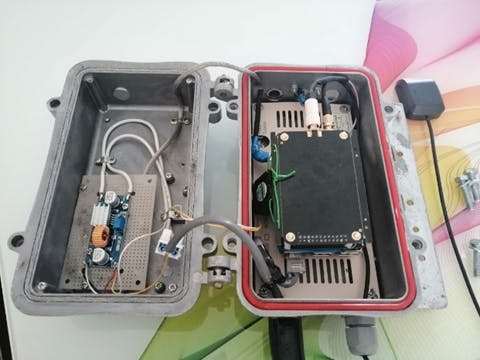
This was supposed to be the final step as far as building the hardware goes. Naturally, we were hoping that we are almost done, however this turned out to not to be the case. As you can see in the first image below, we had finished the build. The fan was installed in the middle of the case, blowing at RAK2245 in order to circulate the hot air. This worked out well (we actually tested it 😊). Adding the PoE Splitter, as can be seen, was easy and straightforward.
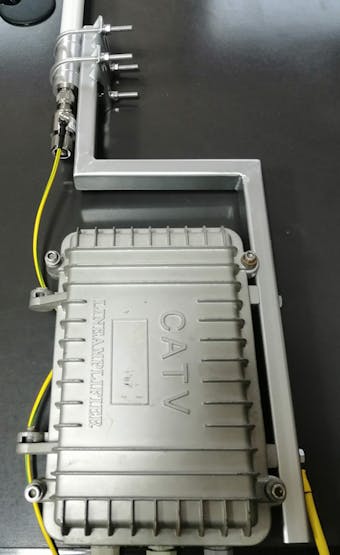
Now comes the tricky part. Initially, we use a plastic tune to mount on the side to have the antenna attached to it. The casing was mounted to it together with the grounding wire. We mounted it and it worked for a day or two, however it seemed to not be very stable. The metal box plus the antenna turned out to be too heavy for such a build so we went another way.
So, we simply used a square pipe that we cut and welded in several places so we can create angles and make it fit over the casing in order to be more compact. See the set of images (closed and open box). This made the build a lot more stable and also pretty.😊Finally, we mounted it on our office terrace, we think it looked quite professional. 😊
Note: We use SMA Male to N-type Female cable to connect the LoRa antenna. It is good to use cables, rather than mounting them directly to the casing. This way, we have avoided breaking the connector if there is a strong wind in addition to being able to position the antenna a lot higher than the Gateway itself.


Step 7
Now we need to put the final touch, the firmware. Admittedly this is not how it goes in a real build, as there is testing, experimentation and reworking, so there is a lot of going forth and back. However, for the purpose of the tutorial we are going to assume everything so far went perfectly and we only need to provision the Firmware to run the Gateway.
RAKwireless has a GitHub repository with firmware for RAK2245. There is an image with ChirpStack for the RPi there as well. We use the clean one with only the basic packet forwarder for connecting to TTN added to the stock Raspbian. We are going as simple as possible for now, perhaps we will upgrade in the future.
In short you should do the following:
- First download Balena Etcher and install it;
- Download Raspbian Stretch Lite;
- Flash the Rasbian image to to your SD card using Etcher;
- Log into your Gateway using your preferred SSH client (we used PuTTY);
- Clone The RAK GitHub repository:
$ git clone https://github.com/RAKWireless/RAK2245-RAK831-LoRaGateway-RPi-Raspbian-OS
$ cd ~/RAK2245-RAK831-LoRaGateway-RPi-Raspbian-OS/lora
$ sudo ./install.sh
As this image comes with a number of goodies as a ChirpStack installation for example we did a trick in order to only install the minimum components to run the Concentrator and Packet Forwarder. Do not start the “install.sh” script in the main directory, instead start the one in the “RAK2245-RAK831-LoRaGateway-RPi-Raspbian-OS/lora” directory. This is all taken into account in the command line above.
If you need instructions on how to etch the image you can refer to this Manual.
For a full tutorial you can use the Quick Start Guide that RAKwireless has on their website.
So, to sum it all up we etched the latest Buster image install Git, clone the RAK repo and install it. Reboot and your Gateway is ready to transmit.
NOTE. It is not a good idea to start the RAK2245 Pi HAT without antennas.
Thanks to Todor Velev and Vladislav Yordanov.
Original Post: https://www.hackster.io/nikolai-manchev/a-diy-outdoor-lorawan-gateway-with-battery-backup-ae8712

