Helium Data Only Hotspot Setup with RAK Concentrator + Raspberry Pi

A Data Only Hotspot is a variation of Hotspots that can participate on the Helium Network by transferring data from the end devices (LoRaWAN nodes), they are eligible for Network Data Transfer Rewards but not Proof of Coverage Rewards.
This guide covers all the steps needed to set up a Data Only Hotspot using a WisLink RAK LPWAN concentrator module and a Raspberry Pi. You will find more details about which models/references are supported in the requirements section. This configuration can be achieved by installing the helium_gateway service available on the gateway-rs repository.
WARNING
Data Only Hotspots cannot earn $HNT, at least for now, and after milestone 2 they will earn $HNT only for Device Packet Transfer. Remember to keep an eye on Light Hotspots Project and the #gateway-development channel on the Helium Discord Server to check how the development process evolves.
Requirements
- Raspberry Pi, multiple families are supported, however not all the models have been tested yet, so it's highly recommended to follow this guide with a model of the families Pi 3 or Pi 4.
- The concentrator module and the proper Pi HAT to interface it with the Raspberry Pi. The following table contains the links to the detailed information available at the RAK store.
| WisLink LPWAN Concentrator | Raspberry Pi HAT |
|---|---|
| RAK2287 | RAK2287 Pi HAT |
| RAK2247 | RAK2247 Pi HAT |
| RAK2245 | The linked reference is a Raspberry Pi form factor module! |
Let's get started!
Step-by-Step
- Packet forwarder preparation
- Select the region plan
- Verify if the packet forwarder is running
- Edit the packet forwarder settings - Helium Gateway service installation
- Downloading the package
- Installing the package
- Region configuration - Verifying the installation
- Inspecting the service logs
- Getting some information about the hotspot
- Testing the packet transfer with an end device - What's next?
Packet forwarder preparation
To get started you must set up the packet forwarder and get some helpful configuration tools used across this guide.
Option 1
You can follow this installation procedure if you are already familiar with the Raspberry Pi, and the RAK concentrator modules. Furthermore, it's highly recommended to start from a fresh Raspbian Buster Lite image (now called'Raspberry Pi OS Lite').
Option 2
You can also follow the Quick Start Guide for your concentrator on the RAK Documentation Center.
Select the region plan
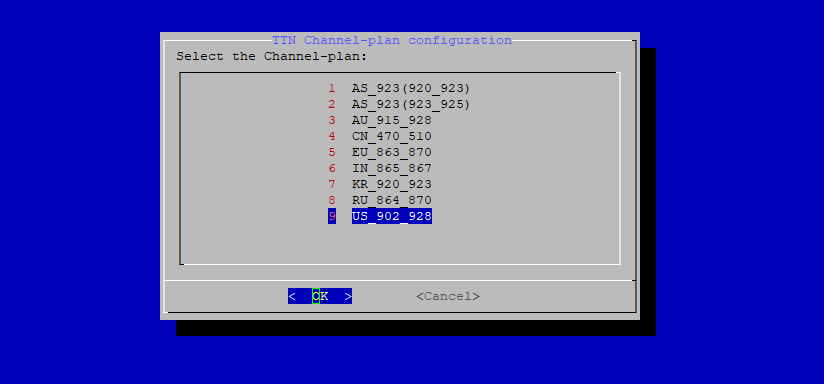
Enter the gateway configuration interface by using the following command.
sudo gateway-configSelect the Setup RAK Gateway Channel Plan option, then Server is TTN, and in the last step choose the proper plan according to your country. For instance, the image shows the option to select US915. To finish, press OK.
Verify if the packet forwarder is running
When the LoRa packet forwarder is running as a service, some log messages are recorded in the syslog. To inspect the logs, run the following command:
sudo tail -f /var/log/syslog | grep ttn-gateway
The log output should show something similar to:
rak-gateway ttn-gateway[1886]: JSON up: {"stat":{"time":"2021-07-21 16:25:00 GMT","rxnb":0,"rxok":0,"rxfw":0,"ackr":0.0,"dwnb":0,"txnb":0,"temp":0.0}}
rak-gateway ttn-gateway[1886]: INFO: [down] PULL_ACK received in 142 ms
rak-gateway ttn-gateway[1886]: INFO: [down] PULL_ACK received in 142 ms
rak-gateway ttn-gateway[1886]: INFO: [down] PULL_ACK received in 142 ms
rak-gateway ttn-gateway[1886]: ##### 2021-07-21 16:25:30 GMT #####
rak-gateway ttn-gateway[1886]: ### [UPSTREAM] ###
rak-gateway ttn-gateway[1886]: # RF packets received by concentrator: 0
rak-gateway ttn-gateway[1886]: # CRC_OK: 0.00%, CRC_FAIL: 0.00%, NO_CRC: 0.00%
rak-gateway ttn-gateway[1886]: # RF packets forwarded: 0 (0 bytes)
rak-gateway ttn-gateway[1886]: # PUSH_DATA datagrams sent: 1 (122 bytes)
rak-gateway ttn-gateway[1886]: # PUSH_DATA acknowledged: 0.00%
rak-gateway ttn-gateway[1886]: ### [DOWNSTREAM] ###
rak-gateway ttn-gateway[1886]: # PULL_DATA sent: 3 (100.00% acknowledged)
rak-gateway ttn-gateway[1886]: # PULL_RESP(onse) datagrams received: 0 (0 bytes)
rak-gateway ttn-gateway[1886]: # RF packets sent to concentrator: 0 (0 bytes)
rak-gateway ttn-gateway[1886]: # TX errors: 0
rak-gateway ttn-gateway[1886]: ### SX1302 Status ###
rak-gateway ttn-gateway[1886]: # SX1302 counter (INST): 210904434
rak-gateway ttn-gateway[1886]: # SX1302 counter (PPS):  0
rak-gateway ttn-gateway[1886]: # BEACON queued: 0
rak-gateway ttn-gateway[1886]: # BEACON sent so far: 0
rak-gateway ttn-gateway[1886]: # BEACON rejected: 0
NOTE
ttn-gateway is just the name for the LoRa packet forwarder service in the configuration for these RAK concentrators; this is like a "legacy name" that doesn’t change when using different network servers.
Edit the packet forwarder settings
You will need to edit some basic options in the packet forwarder configuration to forward the packets to the address and port the helium_gateway service is listening to.
Select the option Edit packet-forwarder config within the gateway-config interface. This option will open the global_conf.json file using the nano editor. Then, set the server_address to 127.0.0.1 and the server ports to 1680, as follows:
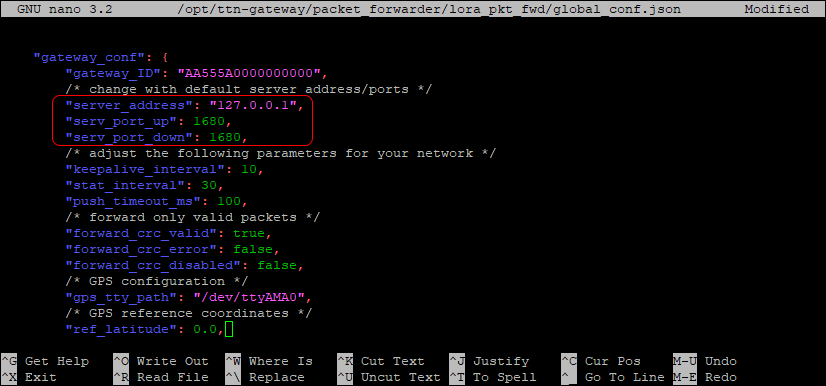
Close the editor by pressing CTRL + X, press ENTER to save the file and restart the packet forwarder to apply the changes by selecting the option Restart packet-forwarder within the gateway-config interface.
IMPORTANT
Every time a new region is selected using the Setup RAK Gateway Channel Plan option, these settings are replaced with the default configuration. So, make sure to keep this in mind if you modify the region later.
Helium Gateway service installation
Downloading the package
Download the latest release from the gateway-rs repository, and set the <version> according to the latest release. You can download it in any directory, for example /tmp.
Option 1
Getting from the repo directly to the Raspberry Pi by running the following commands.
cd /tmp
wget https://github.com/helium/gateway-rs/releases/download/<version>/helium-gateway-<version>-raspi234.deb
Option 2
You can also download it to your computer and pass it to the Raspberry Pi through the Secure Copy Protocol (SCP).
scp helium-gateway-<version>-raspi234.deb pi@<gateway ip>:/tmp/
Installing the package
Run the following command in the same directory you downloaded the package to install the helium_gateway service in the operating system.
sudo dpkg -i helium-gateway-<version>-raspi234.deb
Region configuration
The default region of the helium_gateway service is US915, so you can continue with the next section if you are using this one. Otherwise, you must set your region frequency in /etc/helium_gateway/settings.toml. Add the following line at the beginning of the file:
region = "<region>"
Possible values are: US915 | EU868 | EU433 | CN470 | CN779 | AU915 | AS923_1 | AS923_2 | AS923_3 | AS923_4 | KR920 | IN865.
For instance, if your region is EU868 the content in settings.toml must be.
region = "EU868"

[log]
method = "syslog"
level = "info"
timestamp = false

[update]
platform = "raspi234"
After updating the value, you need to restart the helium_gateway service to apply the changes.
sudo systemctl restart helium_gateway
Verifying the installation
Inspecting the service logs
The service starts after installation automatically. You can check the execution logs by running the following command.
sudo tail -f /var/log/syslog | grep helium_gateway
The first log messages should look like these ones.
rak-gateway helium_gateway[23658]: starting, module: gateway
rak-gateway helium_gateway[23658]: starting, module: router
rak-gateway helium_gateway[23658]: default router, module: router, uri: [http://54.193.165.228:8080/](http://54.193.165.228:8080/), public_key: <public key>
rak-gateway helium_gateway[23658]: selected gateway, module: router, uri: [http://18.216.219.228:8080/](http://18.216.219.228:8080/), public_key: <public key>
rak-gateway helium_gateway[23658]: starting, module: updater
rak-gateway helium_gateway[23658]: updated routing to height 930678, module: router
rak-gateway helium_gateway[23658]: no update found, module: updater
rak-gateway helium_gateway[23658]: ignoring raw packet PushData(Packet { random_token: 25968, gateway_mac: MacAddress { bytes: [228, 95, 1, 255, 254, 3, 45, 43] }, data: Data { rxpk: None, stat: Some(Stat { time: "2021-07-21 17:23:40 GMT", lati: None, long: None, alti: None, rxnb: 0, rxok: 0, rxfw: 0, ackr: Some(0.0), dwnb: 0, txnb: 0 }) } }), module: gateway
rak-gateway helium_gateway[23658]: ignoring raw packet PullData(Packet { random_token: 23178, gateway_mac: MacAddress { bytes: [228, 95, 1, 255, 254, 3, 45, 43] } }), module: gateway
rak-gateway helium_gateway[23658]: new packet forwarder client: MacAddress(E4:5F:01:FF:FE:03:2B), 127.0.0.1:39196, module: gateway
rak-gateway helium_gateway[23658]: ignoring raw packet PullData(Packet { random_token: 16226, gateway_mac: MacAddress { bytes: [228, 95, 1, 255, 254, 3, 45, 43] } }), module: gateway
rak-gateway helium_gateway[23658]: ignoring raw packet PullData(Packet { random_token: 32809, gateway_mac: MacAddress { bytes: [228, 95, 1, 255, 254, 3, 45, 43] } }), module: gateway
Whenever you need to restart the service you can use the command below.
sudo systemctl restart helium_gateway
Getting some information about the hotspot
Use the following command to get the public key address and animal name of your hotspot.
helium_gateway key info
This command should give you an output like the following one.
{
  "address": <hotspot address>,
  "name": <hotspot name>
}
Backup the gateway_key
The gateway_key.bin file located at /etc/helium_gateway stores the information used to identify the hotspot on the Helium Network. It's highly advised to backup this file, especially if you need to recover it later after the onboarding process.
Using SCP could be an option to do the backup; that would be something like this.
scp pi@<gateway ip>:/etc/helium_gateway/gateway_key.bin <destination directory>
If you are using Windows, you can try a tool like WinSCP too.
Testing the packet transfer with an end device
If you have an end device (LoRaWAN node), you can check if the hotspot can transfer packets through the network. In other words, you can check if the devices can send data to the Helium Console. The Helium Console is where you can provision and manage the end devices, so the nodes need to be registered to start using the network.
Some comments and recommendations about the Helium Console
At least for now, it is recommended to use the staging console instead of the production one when we are transferring data through Data Only hotspots. You can differentiate them for the URL they use, console.helium.com for production, and staging-console.helium.wtf for staging. Don't be surprised if you find some differences between those console flavors, basically staging is where the new features are tested before their rollout to production.
IMPORTANT
If the device you will use for testing is registered on the production console, it's better to delete it from there to avoid any unexpected behavior.
To register your end device on the console, you can follow the steps described on Adding Devices.
Inspecting the packet transfer behavior
Make sure your device is configured or flashed with the same keys you registered on the console. Then, when your device is ready to transmit data, take a look at the log messages again.
sudo tail -f /var/log/syslog | grep helium_gateway
Power up or reset your device, every time it tries to send a message, you should see the information related to the packet received by the hotspot and where it is being routed.
rak-gateway helium_gateway[23658]: ignoring raw packet PushData(Packet { random_token: 18563, gateway_mac: MacAddress { bytes: [228, 95, 1, 255, 254, 3, 45, 43] }, data: Data { rxpk: Some([V1(RxPkV1 { chan: 4, codr: _4_5, data: [64, 11, 8, 0, 72, 0, 25, 1, 2, 138, 20, 173, 187, 16, 164, 246, 161, 241, 78, 16, 36, 238, 117, 161, 188, 240], datr: DataRate(SF7, BW125), freq: 904.7, lsnr: 13.2, modu: LORA, rfch: 1, rssi: -20, rssis: Some(-20), size: 26, stat: OK, tmst: 668364099 })]), stat: None } }), module: gateway
rak-gateway helium_gateway[23658]: routing packet to: http://54.193.165.228:8080/, module: router
If you are able to see this kind of logs your hotspot is working like a charm! The logs will record more information according to the router/console state.
Now, you should start to see some events on the console. Sometimes, it could take some minutes before you start to see any activity; wait for a bit and reset your device if it's needed.
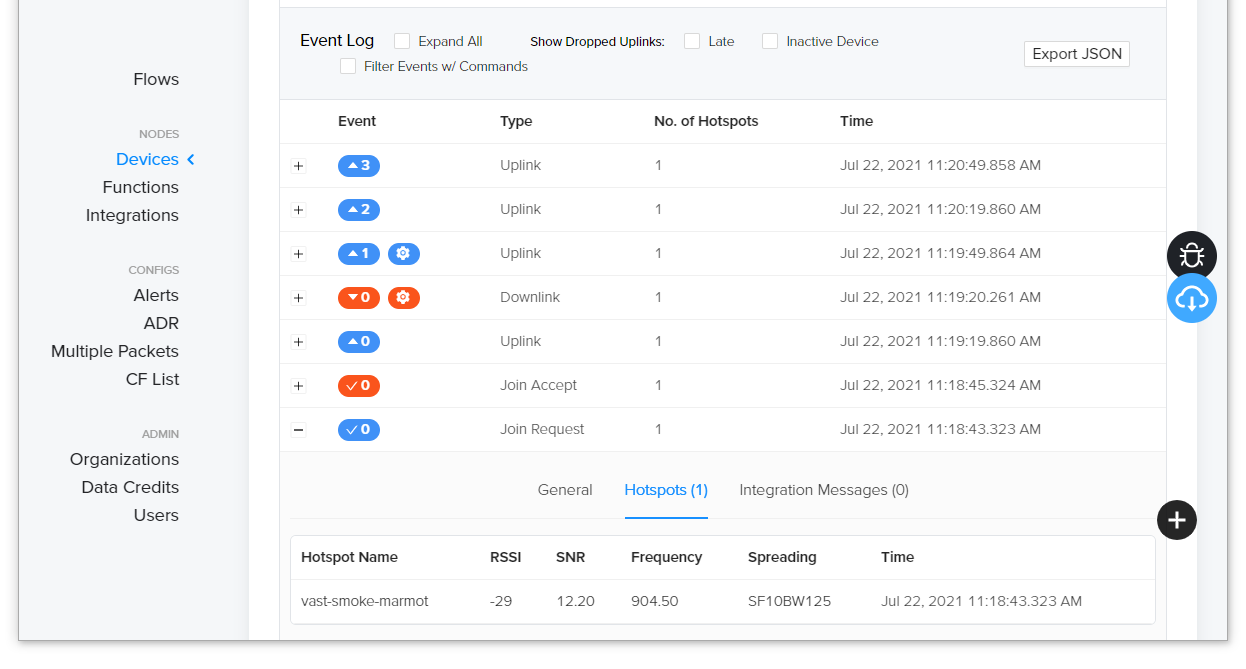
As a final check, you can compare if the Hotspot Name matches the one you obtained before. It could be different if there are more hotspots providing overage around you. In that case, you can explore the Multiple Packets configuration to purchase more packets when several hotspots hear the device.
What's next?
At this point, your Data Only Hotspot is ready to be added to the blockchain! You can find more information about that process here.