Make a Helium Mapper with the WisBlock

Helium Mappers is a community-driven project looking to provide information about the effective coverage for nodes (LoRaWAN end devices) within the Helium Network. The coverage map is available at mappers.helium.com. You will find gray hexes to indicate the regions where one or more hotspots are deployed, similar to the green ones in the Helium Explorer. Additionally, the green clickable hex regions within the Mappers tool show the information collected by the community Mappers about the coverage available in that region.
A Helium Mapper is a LoRa node equipped with GPS, which sends location information as LoRaWAN messages. When at least one Helium hotspot receives the packets, the Helium Console forwards some data such as the Received Signal Strength Indicator (RSSI) and the signal-to-noise ratio (SNR) to the Mappers API. The RSSI is a measure of the power present in the received signal, a higher value (less negative), the stronger it is considered. For the SNR a higher ratio represents a clear signal whereas a negative number represents a noisy signal. Then, the Mappers backend performs some checks, such as filtering valid messages according to the hotspots locations and colors a new green hexagon or updates the existing ones with the latest information. The Helium Discord Server has a #mappers channel. There you will find insightful discussions about the project, help for troubleshooting, as well as other hardware alternatives. In addition, you can receive a 🗺️ mapper role as well.
If you have a Helium Developer Kit or a WisBlock Connected Box, you already have all the main components to build up your first Helium Mapper!
Requirements
- RAK4631 nRF52840 SX1262 Module for LoRaWAN
- WisBlock Base Board (RAK5005-O or RAK19003)
- WisBlock GNSS Location Module (RAK1910 or RAK12500)
- WisBlock 3-axis acceleration sensor (RAK1904)
- Li-Ion/LiPo battery
- RAKBox-B2 Enclosure with solar panel (optional)
The Helium Mapper Kit or the WisBlock Kit 2 include in a single package all the previous components as well. Furthermore, the Helium Mapper Kit option comes with the firmware pre-flashed and ready for you to follow even easier this guide.
The acceleration sensor helps the WisBlock Mapper detect when moving for sending periodic messages every 15 seconds; otherwise, just keep-alive messages are sent every hour. No messages are sent when the location module doesn’t receive a proper fix.
In addition, the BLE capability of RAK4631 enables an easy configuration interface and wireless debugging from your phone, either Android or iOS.
Step-by-Step
Hardware setup
Connecting the WisBlock Modules
Connecting the antennas
Casing and power supply recommendations
Flashing the firmware
From PlatformIO
From a ready-to-use package
Creating the device in the Helium Console
Setting up the LoRaWAN parameters
Over serial
Over BLE
Understanding the WisBlock Mapper operation
Adding a decoder
Adding the mapper’s integration
Connecting the flows
Debugging the integration
Enabling Multiple Packets
Hardware setup
In this section, you are going to attach all the WisBlock modules and the antennas required.
Connecting the WisBlock Modules
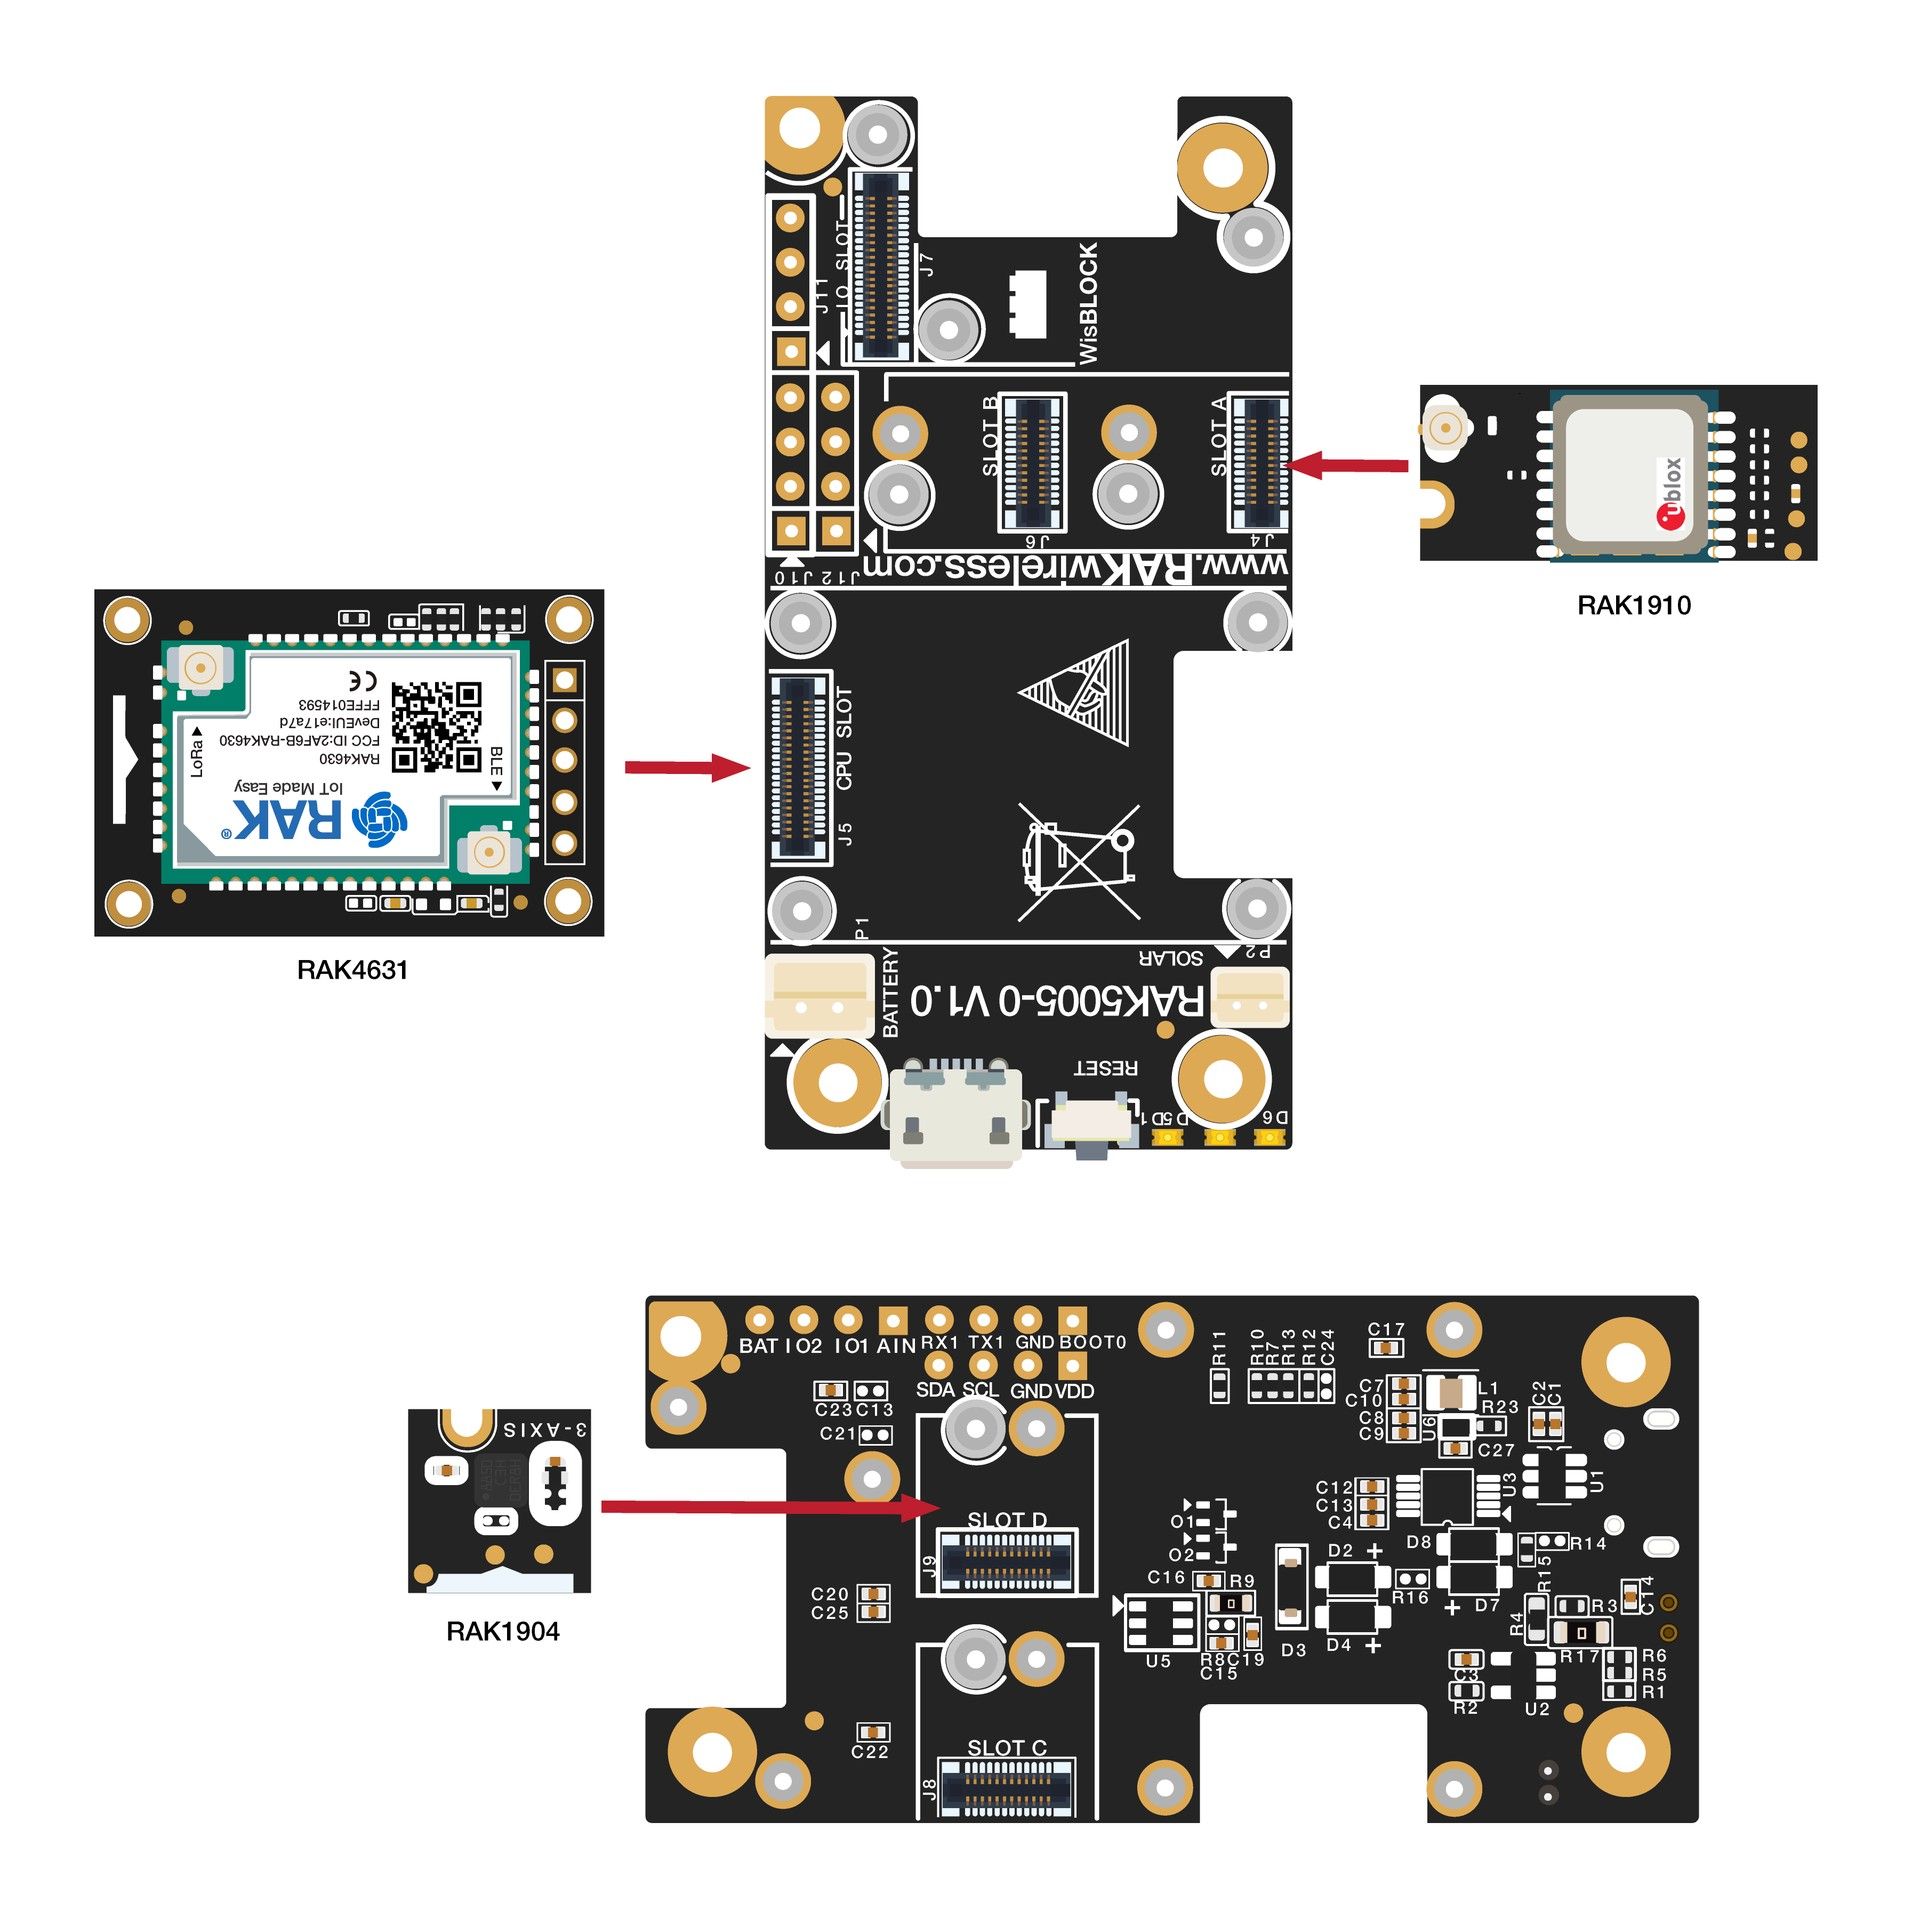
First, connect the RAK4631 WisBlock Core to the Base Board (if not connected yet). Then, place the accelerometer in slot D, which contains the interrupt pin configured in the firmware to wake up the mapper every time movement is detected. Then, connect the GNSS module in slot A, where there is a serial interface needed by the RAK1910. Make sure to always ensure the connection of the WisBlock modules by using compatible tiny screws. For a better understanding of the connection to be made, you can refer to the diagram below.
Connecting the antennas
The RAK4631 has a label on its sticker which highlights where to connect the antennas. In this case, you need to connect both the BLE and LoRa antennas as shown below.

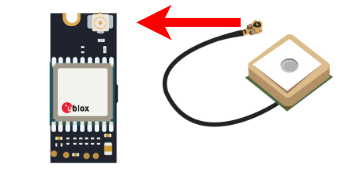
Another essential component for the mapping feature is the GPS antenna for the location module. You need to ensure that it is appropriately connected to have a proper GPS signal.
IMPORTANT NOTE
Due to the weak GPS signal inside the buildings, using the GPS module outdoors is recommended, with a direct line of sight to the sky. This will ensure the necessary signal quality to obtain valid geolocation data. Whatever option you choose for the enclosure, make sure to place the GPS antenna at the very top; the side with the adhesive should point in the direction of the sky.
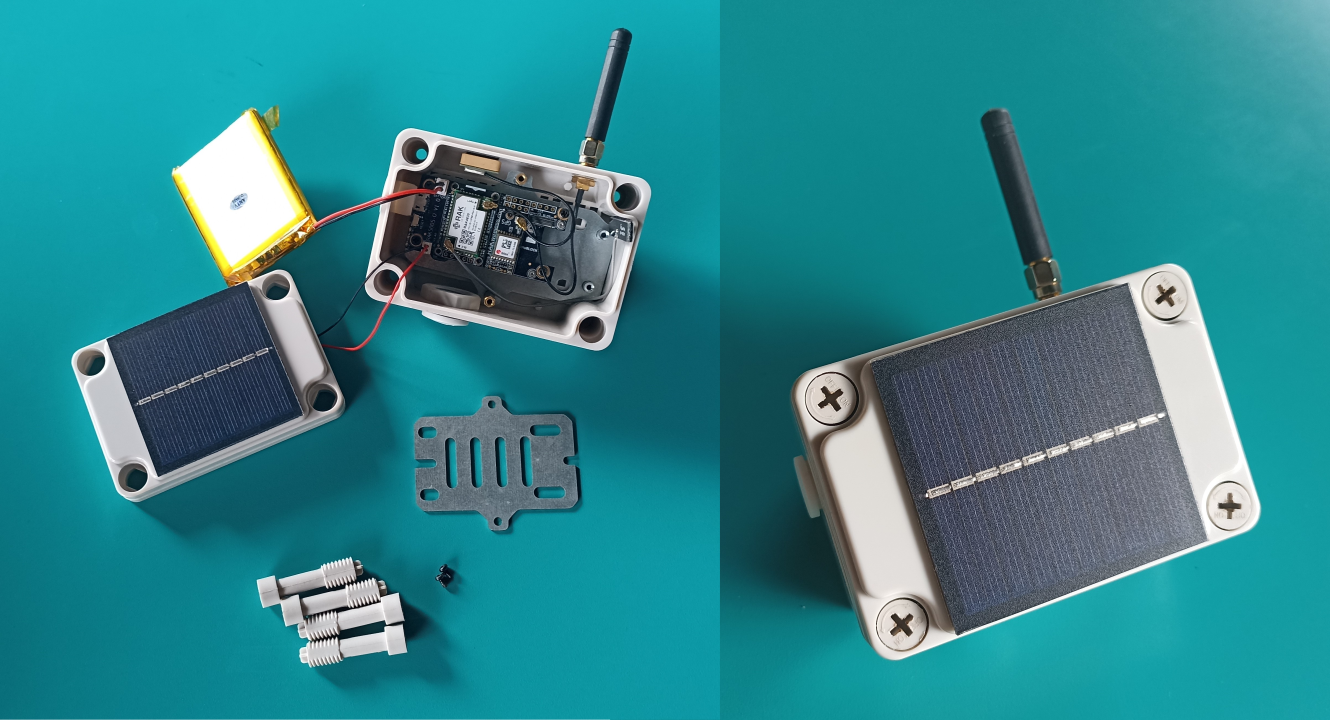
Casing and power supply recommendations
You can use the RAKBox-B2 as the enclosure of your mapper. This enclosure is ready-to-use with the WisBlock; it protects it outdoors and includes a solar panel to recharge the battery. Refer to Battery and Solar Panel Specification and Battery and Solar Panel Connection.
Additionally, you can print an enclosure like the RAKBox-B2 from its 3D model or adapt one of the options at Awesome-WisBlock/Enclosures. Finally, if you end up designing a new enclosure, don’t hesitate to make a pull request to include it in the Awesome-WisBlock repo. We are always happy to receive contributions from our RAKstars!
Flashing the firmware
Two options to flash are proposed. You can select the one you feel more comfortable with it.
IMPORTANT NOTE
If you purchased the Helium Mapper Kit, feel free to skip this section. Instead, you can continue with the Creating the device in the Helium Console section of this guide.
From PlatformIO
Suppose you are already familiar with PlatformIO and running WisBlock projects using it. In that case, you can clone the project from GitHub by running the command share below and using the PlatformIO upload option to compile and flash it quickly. This option is suitable for those who wish to review the firmware source code, contribute to it or use it as a baseline to their very own mapper implementation.
git clone https://github.com/rakstars/WisBlock-RAK4631-Helium-MapperHowever, if you haven’t used PlatformIO with WisBlock before and want to explore setting it up, you can use this guide.
From a ready-to-use package
The other option is to flash a ready-to-use package available on the releases of the GitHub repo.
Download the package by using the following command and setting the <version> according to the latest release.
wget https://github.com/rakstars/WisBlock-RAK4631-Helium-Mapper/releases/download/v1.0.0/WisBlock-RAK4631-Helium-Mapper_<version>.zipFollow the step-by-step provided in this post to check the RAK4631 has the latest bootloader. Then you can use the following adafruit-nrfutil command to upload the firmware file you downloaded previously. Remember to set the <version> and specify the serial <port> the WisBlock is connected.
adafruit-nrfutil dfu serial --package WisBlock-RAK4631-Helium-Mapper_<version>.zip -p <port> -b 115200The green LED flashes while the new firmware is uploading.
Once the firmware is flashed, you are ready to set up the WisBlock Mapper. These next steps include the setup on the Helium console, the LoRaWAN parameters, and other tips to understand the WisBlock Mapper operation.
Creating the device in the Helium Console
Sign in to your Helium Console account at console.helium.com. If it’s the first time you use the Helium Console, you will find the option to register for an account.
Click on Devices, select Add New Device (+), give it a name, modify the Device EUI according to the one printed on the RAK4631 sticker (it’s the one you get when reading the QR code) and click on the Save Device button.
WARNING
After device creation, you will notice a Pending... indicator, which means the device is waiting for an internal process within Helium Network logic before its first join. It could take up to 20 minutes. This behavior is related to the XOR filter mechanism, and you can find more information about it here.
When you click on the device to look at the device information, you will find a bug button on the right side to view the device packet transfer logs in real-time; this is a perfect option for debugging that we’re going to use later.
Let’s move to the configuration needed to receive the first message from the device. In other words, your first LoRaWAN packet.
Setting up the LoRaWAN parameters
Since the firmware uses the WisBlock-API library, you will find two main options to set up the LoRaWAN credentials without digging into the firmware source files. The first one is a serial interface you can access while the WisBlock is connected to any of the USB ports of your PC. The second one uses the BLE capabilities to send the configuration from a smartphone.
The parameters to modify are the ones that differ from the default configuration. In this case, the identifiers and the AppKey for joining the network using the Over-the-Air-Activation (OTAA) method, and the region frequency.
IMPORTANT NOTE
For regions such as US915 and AU915, it is possible to configure a regional channel mask (aka sub-band), which allows choosing the subset of channels the device uses to send the LoRaWAN packets. Currently, Helium uses sub-band 2 for those regions.
Over serial
Open your preferred tool to connect with serial ports. For instance, CoolTerm, PuTTY, Tera Term, the Arduino Serial Monitor, or the PlatformIO monitor command are common options. Once you establish the connection, send one by one the following AT commands.
From the Helium console, you can copy the values to set <YOUR_DEVEUI>, <YOUR_APPEUI>, and <YOUR_APPKEY>.
Set the Device EUI.
AT+DEVEUI=<YOUR_DEVEUI>Set the Application EUI.
AT+APPEUI=<YOUR_APPEUI>Set the Application Key.
AT+APPKEY=<YOUR_APPKEY>Possible values for the <REGION_CODE> parameter for the next command are:
| Code | Regional Band | Code | Regional Band |
|---|---|---|---|
| 0 | AS923-1 | 7 | KR920 |
| 1 | AU915 | 8 | US915 |
| 2 | CN470 | 9 | AS923-2 |
| 3 | CN779 | 10 | AS923-3 |
| 4 | EU433 | 11 | AS923-4 |
| 5 | EU868 | 12 | RU864 |
| 6 | IN865 |
Set the LoRaWAN region
AT+BAND=<REGION_CODE>If you are using US915 or AU915 as the region, you must set the sub-band to 2 with the following command.
AT+MASK=2Set the automatic transmission period. In this case, it is used as the period for the keep-alive messages for the mapper.
AT+SENDFREQ=3600Start the joining process.
AT+JOIN=1:1:8:10Detailed documentation about all the AT commands with their parameter options is available in the WisBlock-API documentation.

Over BLE
WisBlock Toolbox is a mobile application for Android. It includes an LPWAN SETUP module to communicate the configuration using the custom BLE service implemented in the WisBlock. However, even though it is only available for Android, mobile apps that implement the BLE UART service can be used to set up using AT commands as well. For instance, iOS users can download nRF Toolbox as an alternative.
Using the WisBlock Toolbox LPWAN SETUP module
Download WisBlock ToolBox available for Android devices on Google Play.
When you open the WisBlock ToolBox, you will find several modules. First, select LPWAN SETUP. Then, click on the Bluetooth icon to display the list of available devices and choose your Mapper from the list; it is shown with the prefix WB-Mapper. Next, enable the Auto join option, select the region, and set the value for the Send Repeat Time option. Then enter the LoRaWAN credentials and set the Subband value (you must set the sub-band to 2 when using US915 or AU915 as the region; otherwise, the default value is OK).
Using the nRF Toolbox UART module
The WisBlock Toolbox app is not available for iOS users yet. However, the nRF ToolBox app can be used as an alternative. The process is very similar to the one described for the serial option using AT commands; basically, you can send the same commands after establishing a connection to the WisBlock using the UART module within the app.
Download the nRF ToolBox from Google Play or the App Store, connect to the WisBlock Mapper, and send the commands.
The following animations show how to establish the connection and send one AT command.
Understanding the WisBlock Mapper operation
After the LoRaWAN setup, the WisBlock Mapper tries to join the network. If there’s a hotspot in range, you will receive Join Request messages in the Helium console Event Logs. You can use the Debug View to watch more detailed information. Every time you power up or reset the WisBlock Mapper, a new join procedure is performed.
The UART modules within the WisBlock Toolbox and nRF Toolbox apps allow debugging the mapper behavior from your phone over BLE. The device is connectable (BLE discoverable) after a wake-up or a reset. Remember the wake-up occurs when it is moving or the period defined for the keep-alive messages.
While connected using the UART module, log messages inform about the GNSS, the accelerometer interrupt detection, and the timing to send the LoRaWAN packets.
It’s time to move your WisBlock Mapper to get the first GNSS location. Move to a place where you have a direct line of sight to the sky and wait until you receive a valid GNSS position.
Adding a decoder
Every uplink message sent by the WisBlock Mapper contains a payload of 14 bytes size. The payload needs to be decoded to obtain the latitude, longitude, altitude, accuracy, and battery level values.
Click on Functions, select Add New Function, assign a function name, select Decoder as the Function Type, and Custom Script in the Choose Format selector.
After Custom Script is selected, a new field to enter the decoder is shown. Copy and paste the following code and click on the Save Function button.
function Decoder(bytes, port) {
    var sensor = {};
    sensor.latitude  = (bytes[0] | bytes[1] << 8 | bytes[2] << 16 | bytes[3] << 24 | (bytes[3] & 0x80 ? 0xFF << 24 : 0)) / 100000;
    sensor.longitude = (bytes[4] | bytes[5] << 8 | bytes[6] << 16 | bytes[7] << 24 | (bytes[7] & 0x80 ? 0xFF << 24 : 0)) / 100000;
    sensor.altitude  = (bytes[8] | bytes[9] << 8 | (bytes[9] & 0x80 ? 0xFF << 16 : 0));
    sensor.accuracy  = (bytes[10] | bytes[11] << 8 | (bytes[9] & 0x80 ? 0xFF << 16 : 0)) / 100;
    sensor.battery   = (bytes[12] | bytes[13] << 8 | (bytes[9] & 0x80 ? 0xFF << 16 : 0)) / 1000;
    return( sensor );
}
Adding the Mapper integration
The Mappers project has an API to send the data from an HTTP integration within the console. You can find details about the required fields at Mappers API | Helium Documentation.
Click on Integrations, select Add New Integration, select HTTP. Then, copy and paste the following Endpoint URL:
https://mappers.helium.com/api/v1/ingest/uplinkFinally, give a name to the integration and click on the Add Integration button.
Connecting the flows
It's time to put the pieces together! For every one of the components you created before, you will find a Node to drag into the flows Workspace. Next, click on Flows, grab the device, the decoder, and the integration from the node section tabs. Then use the connection points to specify how the data flows from the device to the integration.

Debugging the integration
Open the debug view, move your WisBlock Mapper and look at the console events.
Enabling Multiple Packets
There is a configuration option to purchase more packets when several hotspots hear the device. For mapping purposes, this is a good one to provide more information to the mappers API. However, it increases the DC consumption. It’s up to you how many packets you want to purchase. This option could vary according to the hotspots deployed where you are mapping and the DC amount you are willing to use for mapping.
What’s next?
Move with your WisBlock Mapper around your city, your town, or wherever you wanna check Helium coverage. Remember to visit mappers.helium.com to check the results and continue coloring new hexes.
We love to see more 🗺️Mappers lighting up the coverage. Show us your results and win a RAK meme t-shirt and your RAKstar patch. Share a photo of your mapper on Twitter tagging @HeliumMapping and @RAKwireless to participate.
Read more: Helium Developer Kit