Basics™ Station on RAK WisGate Developer Gateways
Introduction
Since you are here, you probably know what Basics™ Station is and you are interested in knowing how to run it on one of our WisGate Developer Gateways or any other device. But first, let me make a brief introduction.
LoRa Basics™ Station is a LoRaWAN® packet forwarding protocol, created with security and flexibility in mind. A "packet forwarder protocol" is the way LoRaWAN Gateways communicate with LoRaWAN Network Servers (LNS), no matter if they are local, or in the cloud. It's a software service that runs on every gateway.
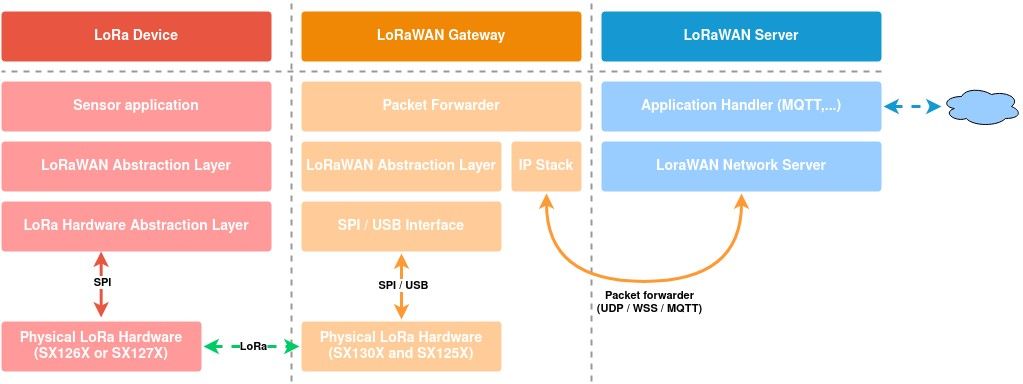
Most gateways still run a packet forwarder named "Legacy UDP Packet Forwarder" or "GWMP Protocol". It was created by Semtech (the people behind LoRa®) to show how to connect a gateway to an LNS. It should have only been a proof of concept but the lack of an alternative made it the default packet forwarder for most LoRaWAN gateways out there, including the WisGate Developer Gateways we sell at RAK.
Three years ago, Semtech presented Basics Station (as it's commonly known) as the new packet forwarder protocol for LoRaWAN gateways. It's not an alternative to the legacy UDP packet forwarder, it's a replacement. Semtech and LoRaWAN cloud providers are pushing hard to replace the unsecured legacy packet forwarder with Basics Station.
This won't happen in the blink of an eye, but you should start planning to migrate your gateways to Basics Station (or other secure protocols, supported by your LoraWAN Network Server) if you are still using the UDP packet forwarder.
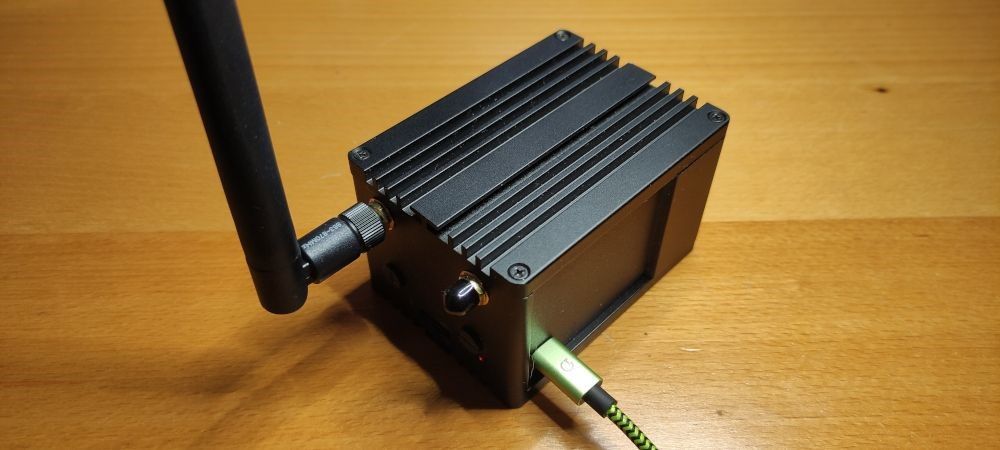
So, how do you use Basics Station on the WisGate Developer Gateways? Since the gateways are based on Raspberry Pi with a Linux distro running on it, an option would be to go to the Basics Station repository (did I mention it is Open Source?), download the code, build, and run it. Easy, isn't it?
Well, you are right, it’s not so easy. If you try, you will find that actually there are different flavors of the code for different concentrators (SX1301 original design, corecell design, and picocell design so far). It also has dependencies on the concentrator HAL libraries (HAL stands for Hardware Abstraction Layer, the code that directly talks to the chip) and on some third-party libraries. And you will probably have to patch the code here and there to make it run on your device.
OK, I agree, it is not easy at all. And you still have to configure the thing! So isn't there an easier way to do it?
Yes, there is.
Meet Docker

You’ve heard about Docker but you didn't dare to try it out? Well, you should. Docker - or other containerization solutions like Podman, LXC or Kubernetes - is a great way to deploy services on a machine in a fast, easy, and isolated way. By using Docker, you can forget all the fuss about compatibility issues, dependencies,... and no more "polluting" your system with dozens of packages you don't know what they are needed for. And even better: forget about the nightmare of incompatibilities between different services!
You can think of Docker as a package manager that deploys services in a (mostly) isolated container without messing with your host system. Deploying the Basics Station service in your WisGate Developer is a matter of running only one command. But before that, you need to have Docker installed.
So, let's assume that you have an OS running on the Raspberry Pi. It can be a fresh installation of Raspberry Pi OS or the image that comes with your WisGate Developer gateway. Installing Docker is a matter of typing a few commands. Let's go through them one by one so you know what you are doing.
- The first step is to check if you are running the latest packages. It's a good thing to do from time to time especially the first time you set up a new machine.
sudo apt-get update && sudo apt-get upgrade -y
- Install Docker by running the convenient script, provided by the developers. The script you will download and run takes care of the subtle differences between different OS so it will work the same if you are running a Ubuntu, RedHat or MacOS.
curl -sSL https://get.docker.com | sh
- Configure Docker to run at boot.
sudo systemctl enable docker
- Add your user to the Docker group, so you can manage it without sudo. Now, this is not required and is only a convenience. It's also slightly more secure not to do it, so it's up to you.
sudo usermod -aG docker ${USER}
- Now you can reboot the machine and check the installed version (with or without sudo, depending on the previous step):
docker --version
- Finally, let's add Docker Compose to the system. Docker Compose is a tool to manage Docker containers through configuration files and it can be very handy when there are a lot of options involved.
sudo apt install -y python3 python3-dev python3-pip libffi-dev libssl-dev
sudo pip3 install docker-compose
docker-compose --version
Configuring the Gateway
Same as with the "old" UDP packet forwarder, when setting up a connection to a LoRaWAN Network Server (LNS) using Basics Station you need the identification of the Gateway, also known as Gateway EUI.
The Gateway EUI is an 8-bytes code that uniquely identifies the gateway. A common approach when using a Raspberry Pi is to use the Ethernet MAC. You can easily get EUI by running the following command:
cat /sys/class/net/eth0/address | awk -F\: '{print toupper($1$2$3"FFFE"$4$5$6)}'
When using Basics Station, you will also need a key to grant you access to the LNS. The key is named TC_KEY and you can get it from your network server. For the purposes of this guide The Things Network (TTN) will be used as a LoRaWAN Network Server so you will register the gateway first in order to get an API key.
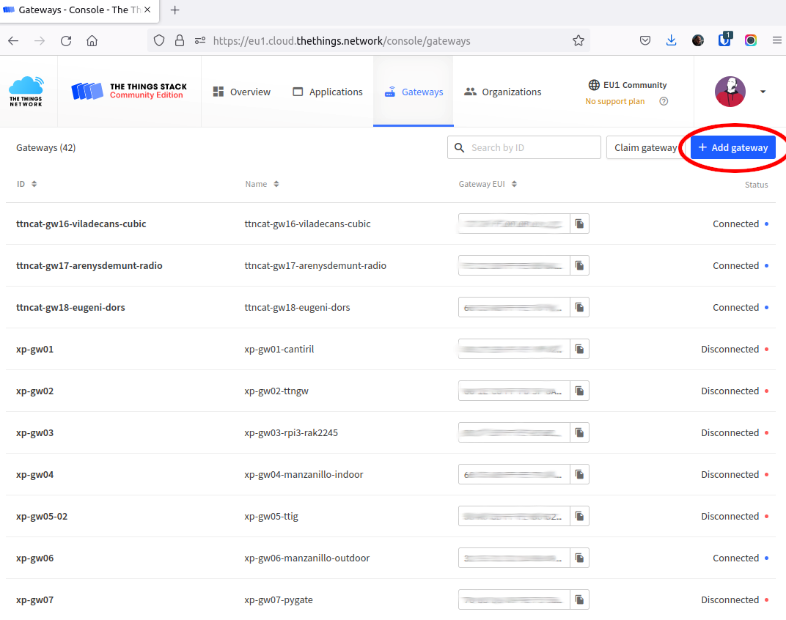
So, assuming you already have an account at TTN you go to the Gateways tab and you click on "+ Add gateway".
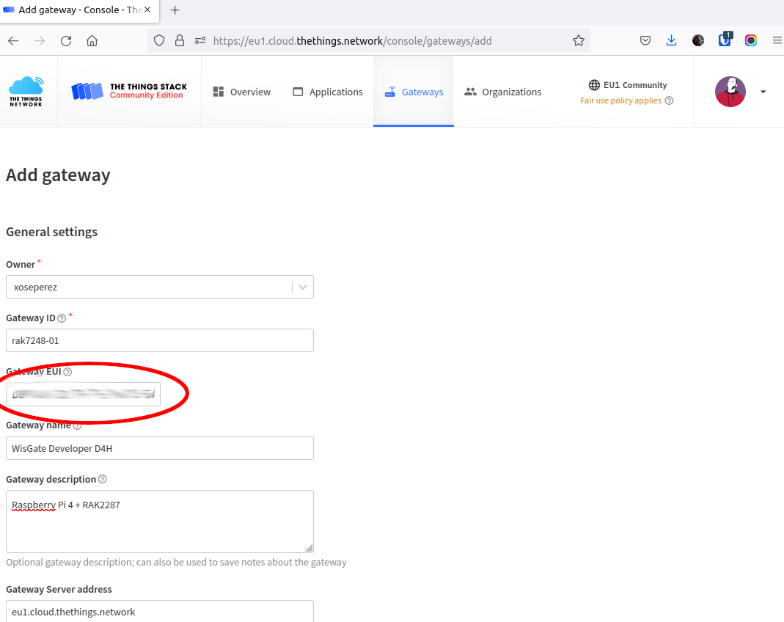
And then you need to configure the gateway options. The most important one is the Gateway EUI, you have to paste the EUI you got at the step before.
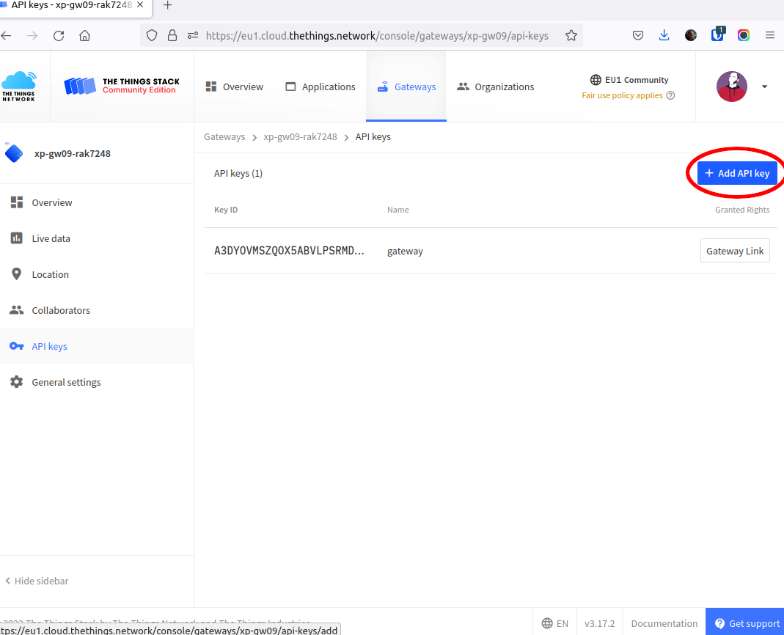
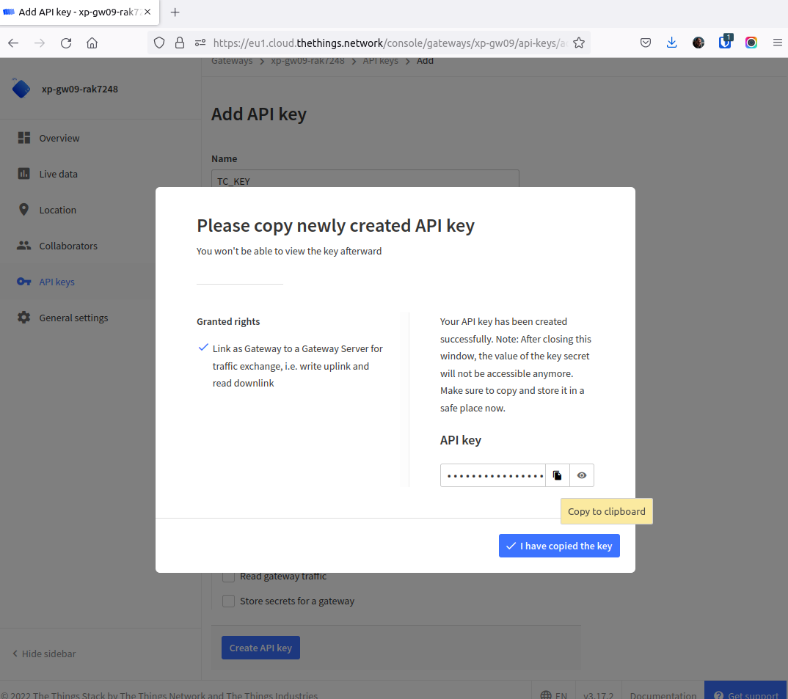
Save the gateway and click on the "API Keys" option on the left menu, and click on "+Add API key".
Next you will have to give special permissions for this key. Since you are going to use it to communicate the gateway with the LNS you only need the "Link as gateway to a Gateway Server for traffic exchange" permission.
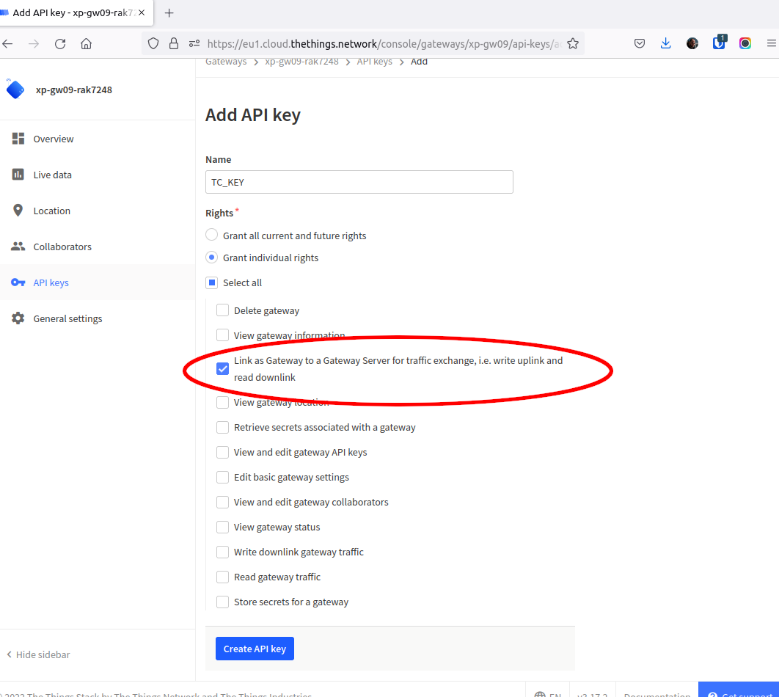
Select it and click "Create API key" at the bottom of the page. A dialog window with the API key will pop up. Copy and paste it somewhere for future use. Please mind that you will not be able to copy it again so if you lose it you will have to create a new key.
Running the service
The Gateway EUI and the API key are the bare minimum you need to connect your gateway to TTN. Only one thing is missing before running the service. In a standard Raspberry Pi OS system, the SPI interface is disabled so you have to enable it in order to connect to the LoRaWAN concentrator. You can do that using "raspi-config" utility or, faster, typing this command:
sudo dtparam spi=on
Now, let’s configure the service. It's much more convenient to create a configuration file with all the info to run the container. That is why you installed Docker Compose before. You will name this file "docker-compose.yml" and paste the contents below. Please note this is a YAML file and indentation is important.
version: '2.0'
services:
  basicstation:
      image: xoseperez/basicstation:latest
      container_name: basicstation
      restart: unless-stopped
      devices:
      - /dev/spidev0.0
      - /dev/gpiochip0
      environment:
        MODEL: "RAK7244
        GATEWAY_EUI: "0011223344556677"
        TC_KEY: "NNSXS...."
You will have to replace the MODEL with the model of your gateway, the GATEWAY_EUI environment variable to the EUI value before, and also copy the API key you got from the Network Server to the TC_KEY variable. The service will try to connect to the European cluster of TTN by default. If you want to connect to a different TTN cluster, check the TTN_REGION variable, or if you want to connect to a completely different LNS you will have to set the TC_URI and TC_TRUST variables.
Next, you are going to pull the image (xoseperez/basicstation:latest) from the Docker Hub by typing:
docker-compose pull
It might take a few seconds or a minute, depending on your Internet connection. Once downloaded you can just bring the service up by typing:
docker-compose up
The service will bring up the concentrator, connect to the LNS and establish a secure channel to it. You should see the connection on the TTN console and the service log echoing "Concentrator started". If you happen to have a device transmitting data you will be able to see the packets both on the gateway log and on the TTN console.
As you can imagine, you can stop the service by using Ctrl+C to break the connection to the log and then bringing the service down:
docker-compose down
Now that you have checked that the service works great you can run it in the background (in daemon mode, that is what the "d" in the command below means)
docker-compose up -d
Since the "restart" property was defined as "unless-stopped" it will restart the service automatically upon reboot or after a failure. It will only stop if you explicitly bring it down.
Basics Station in depth
There is more to the Basics Station service than what has just been reviewed. Basics Station actually defines 2 different protocols, the CUPS protocol and the LNS protocol, sometimes referred to as TC.
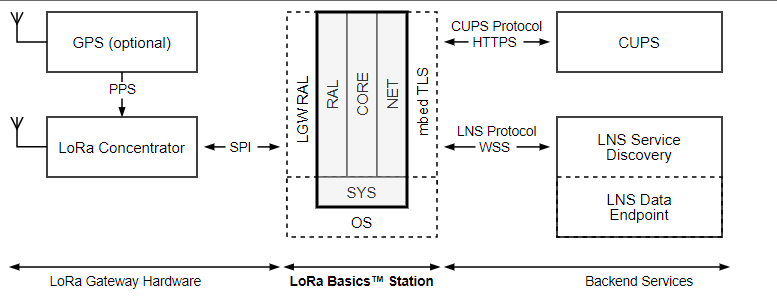
CUPS stands for Configuration and Update Server. When CUPS is configured, the gateway contacts the CUPS server using HTTPS at boot and regularly queries for configuration changes (new LNS URI, for instance) and firmware updates. The server responds with the URI for the LNS and the required keys to connect to it using the LNS protocol.
LNS stands for LoraWAN Network Server. The gateway will contact the LNS using the LNS protocol over WSS to get the actual endpoint and start exchanging uplink and downlink messages.
Also, the Docker image you have used has lots of options to use it with different kinds of concentrators, using different interfaces (SPI or USB), on different ports. The example above will probably match 99% of the use cases with WisGate Developer Gateways but if you have a special setup you might want to read the documentation on the LoRa Basics™ Station for Docker repository.
As an example, take a look at the "docker-compose.yml" file below for a USB based concentrator connecting to the North America cluster of TTN using CUPS protocol:
version: '2.0'
services:
  basicstation:
    image: xoseperez/basicstation:latest
    container_name: basicstation
    restart: unless-stopped
    devices:
      - /dev/ttyUSB0
    environment:
      MODEL: "RAK7371"
      DEVICE: "/dev/ttyUSB0"
      GW_RESET_GPIO: 0
      GATEWAY_EUI: "0011223344556677"
      TTN_REGION: "nam1"
      CUPS_KEY: "NNSXS...."
Summary
Running Basics Station on a WisGate Developer Gateway using Docker is not а complicated task, but the first time can be confusing if you are not used to Docker. It is also a little more involved than the UDP packet forwarder, since you need an API key, but you have an end-to-end security in return, so it pays off.
The huge benefit of Docker is that you can have many isolated services running alongside in your device and once you learn how to deploy one, deploying another becomes quite fast. Imagine having a standalone WisGate Developer with all you need to receive, persist and analyze the data from LoRaWAN sensors. Check these out:
- LoRa Basics™ Station for Docker
- The Things Stack LoRaWAN Network Server
- Node-RED low code programming environment for message processing
- InfluxDB time series database
- Grafana dashboards
The Basics Station Docker image supports arm64 (like Raspberry Pi 4) and armv7 (like Raspberry Pi 2-3), but it also supports amd64 architectures common to most PCs out there. So, you can actually turn your laptop or workstation running Linux, MacOS or Windows 10+ into a LoraWAN gateway using a USB concentrator such as our RAK7271 or RAK7371 WisGate Developer Base concentrators.
